PGCP 考试第二部分:简答题
注意:实操考试要求在“考试星”系统下考试,无法粘贴,只能截屏上传答案。
0.1. 修改时区
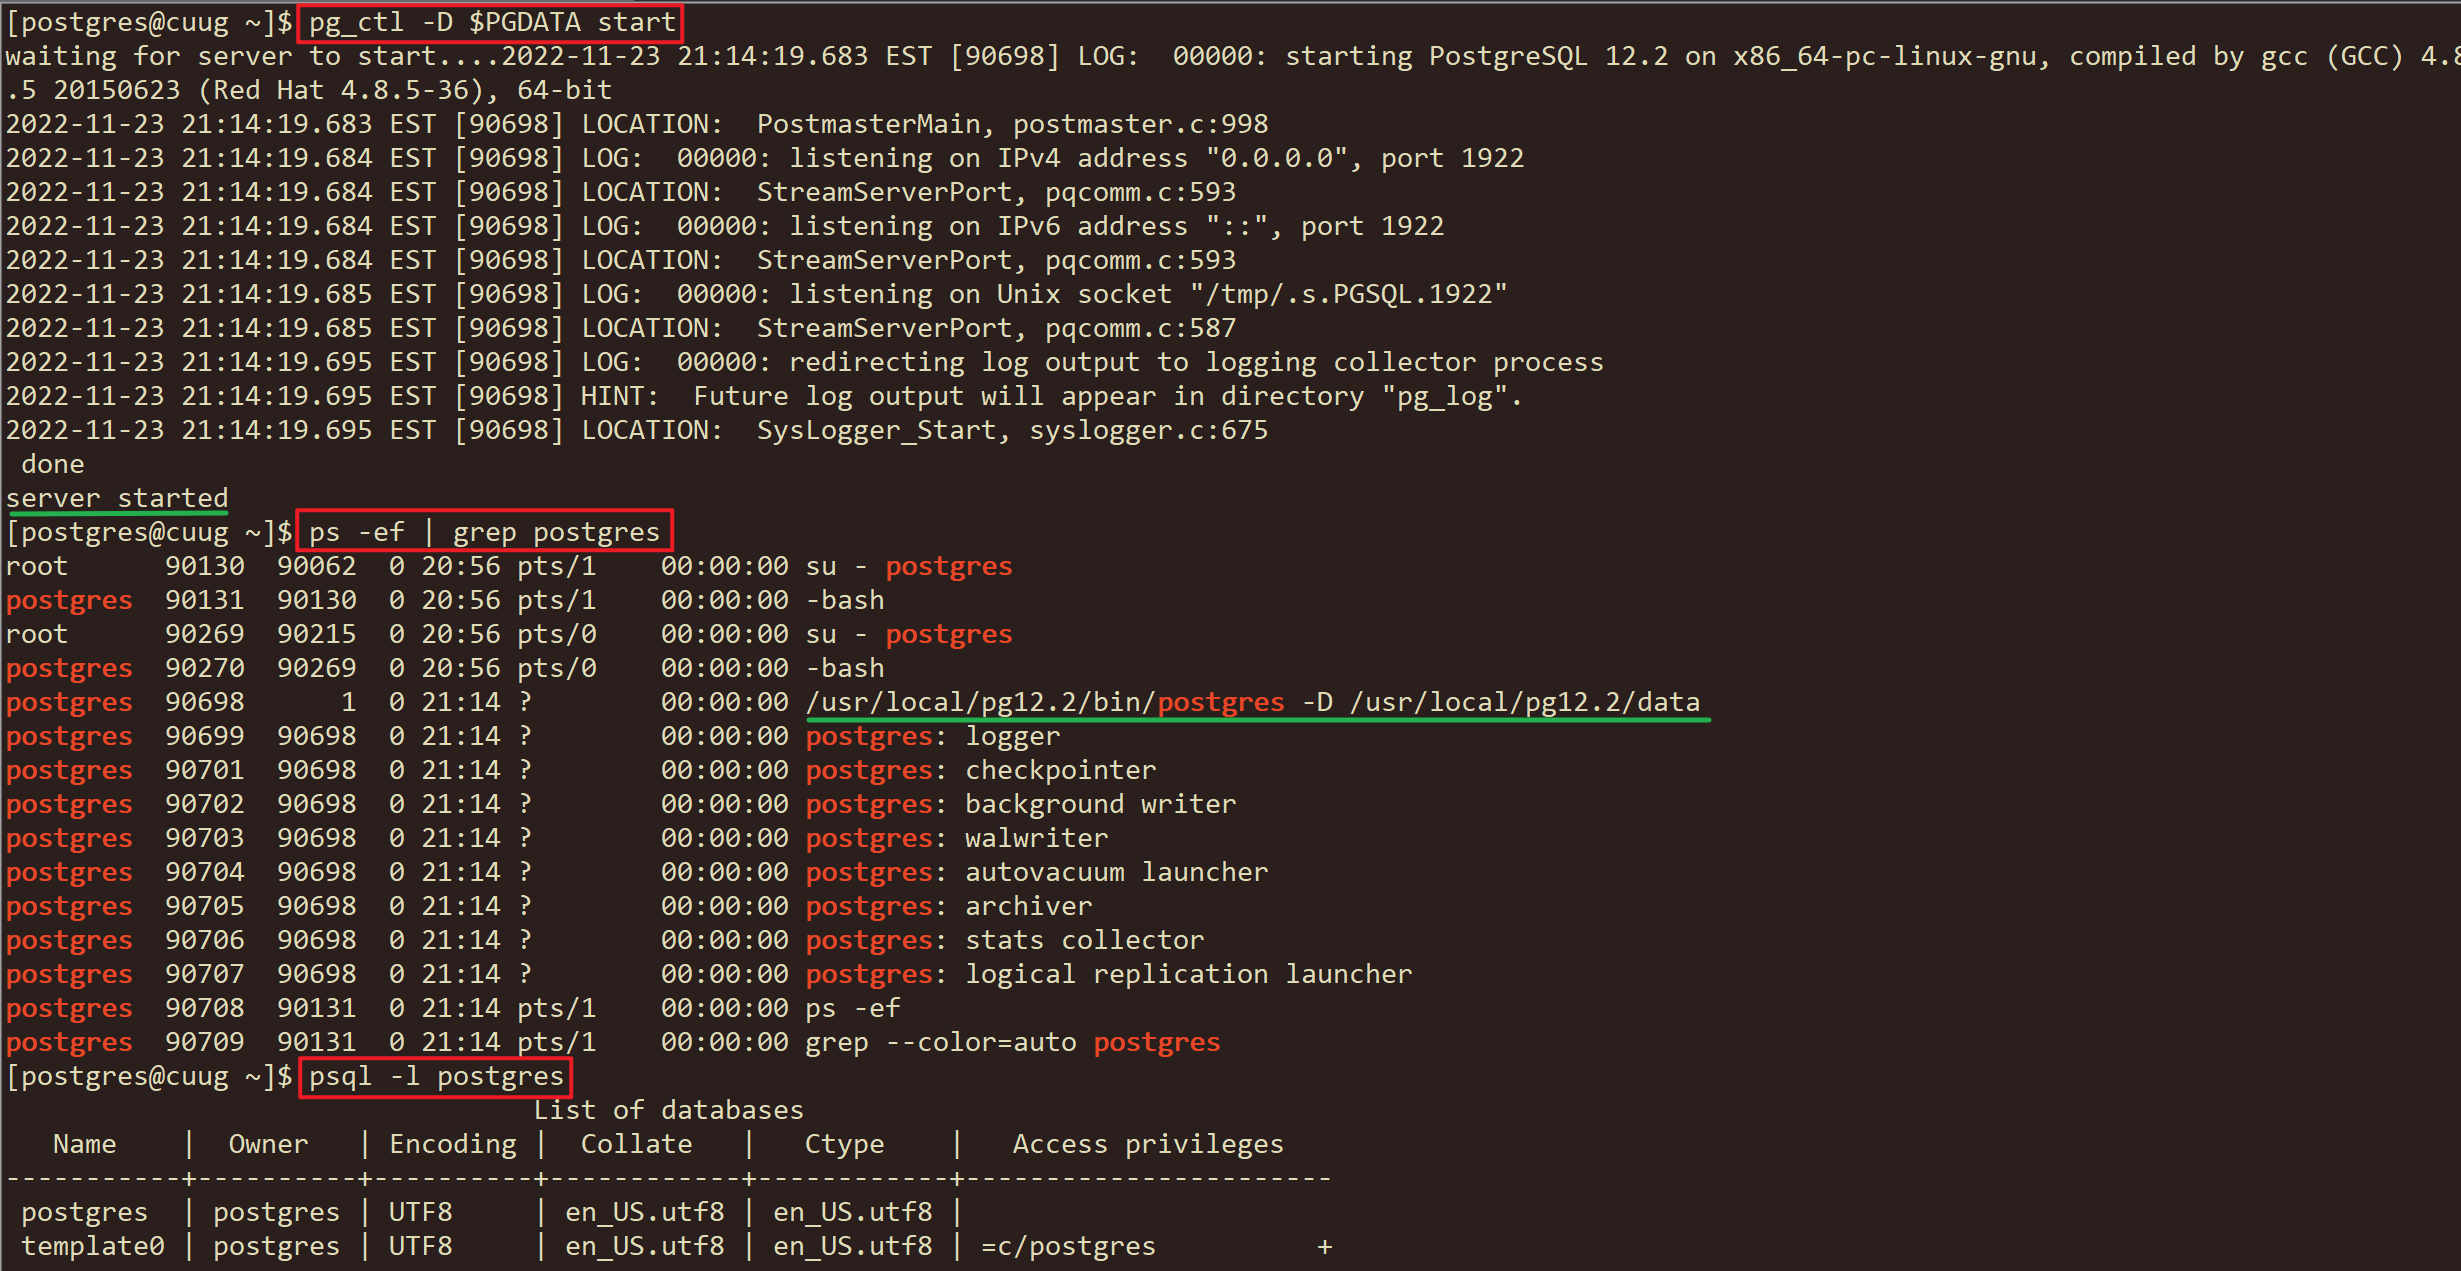
0.2. 在安装postgresql v12 软件,同时创建一个数据库集簇。
0.2.1. 重启数据库
pg_ctl restart -D $PGDATA
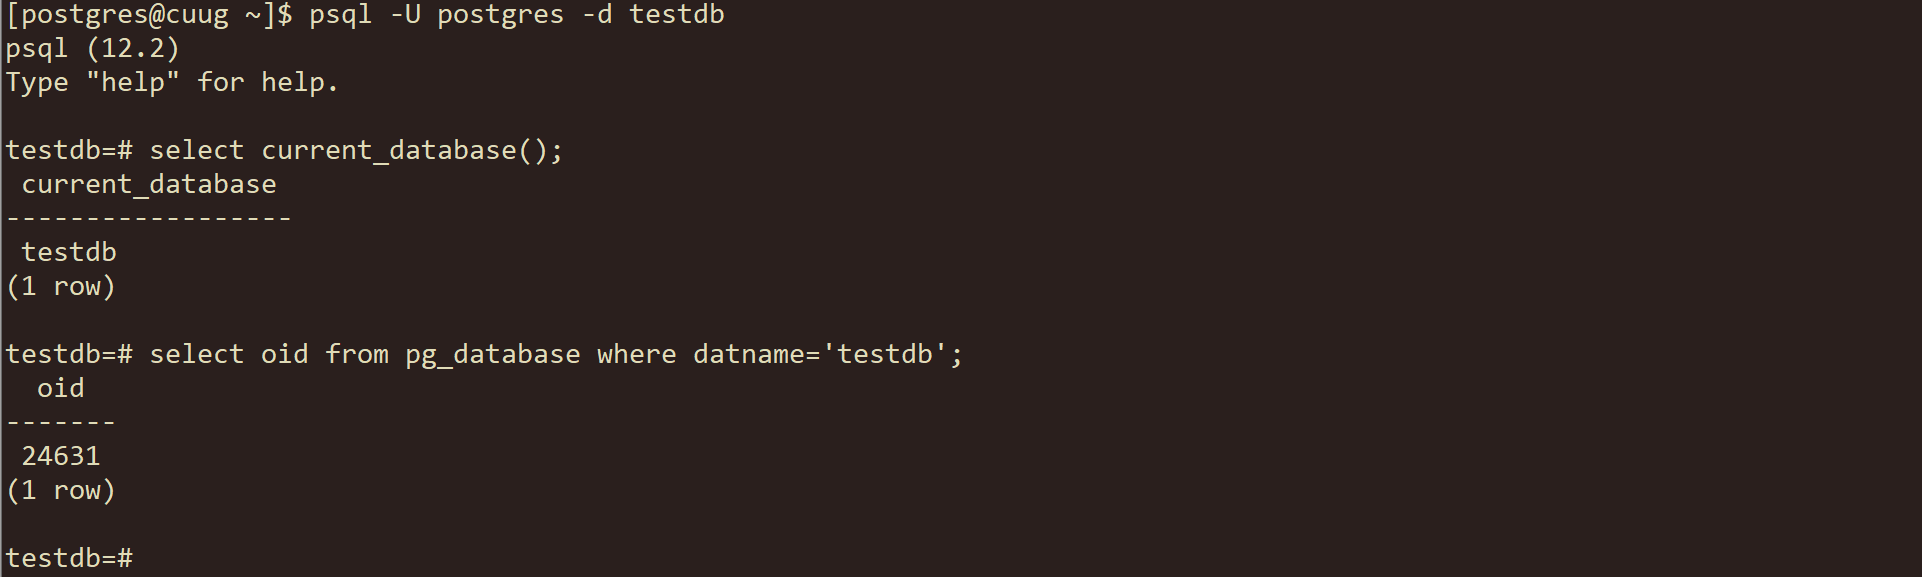
0.3. 创建数据库testdb,后面所有操作的表都要放在这个数据库上。
postgres>
createdb testdb  && psql -l

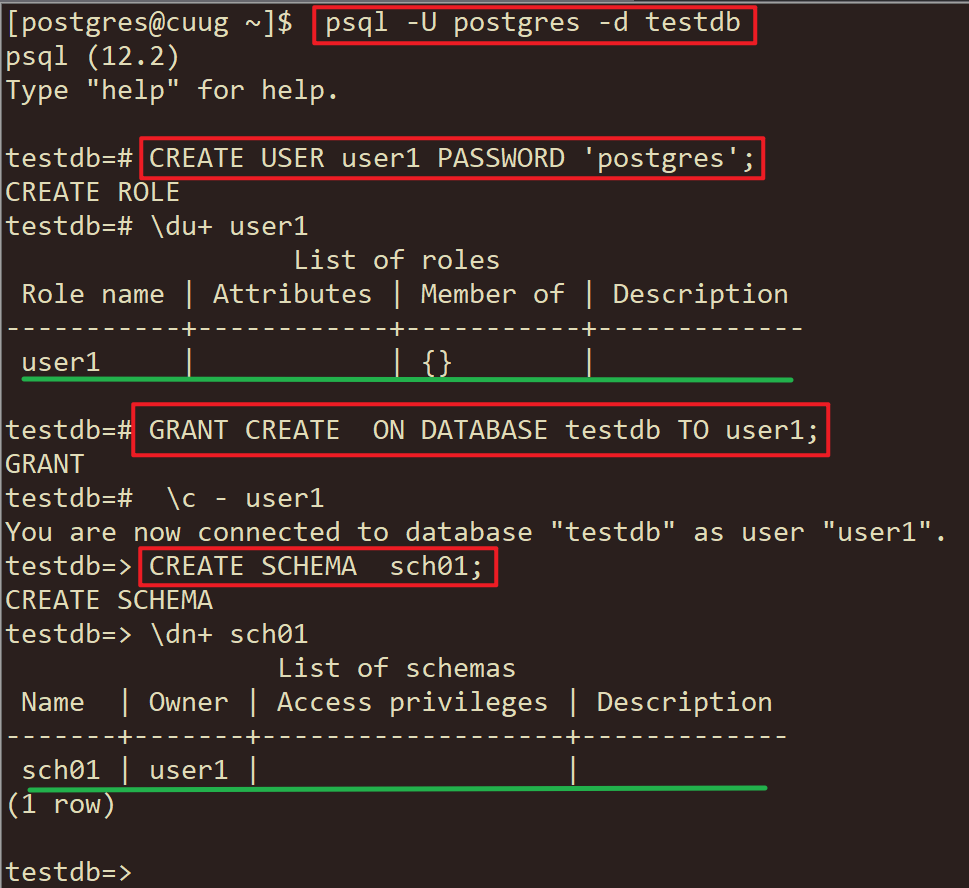
0.4. 创建用户user1,同时授权在testdb上创建模式的权限。
postgres> date
postgres> psql -U postgres -d testdb << EOF
CREATE USER user1 PASSWORD 'postgres';
\du+ user1
GRANT CREATE  ON DATABASE testdb TO user1;
 \c - user1
CREATE SCHEMA  sch01;
\dn+ sch01
EOF
0.5. 用户user1创建表test1,表结构要求:id列数据类型为整数、主键约束,data列数据类型为text,往表插入1万条数据,列值可以是随机的。
postgres> date
postgres> psql -U postgres -d testdb << EOF
\c - user1
select now();
CREATE TABLE test1(id int primary key, data text);
INSERT INTO test1 VALUEStext);
SELECT count(*) FROM test1;
EOF

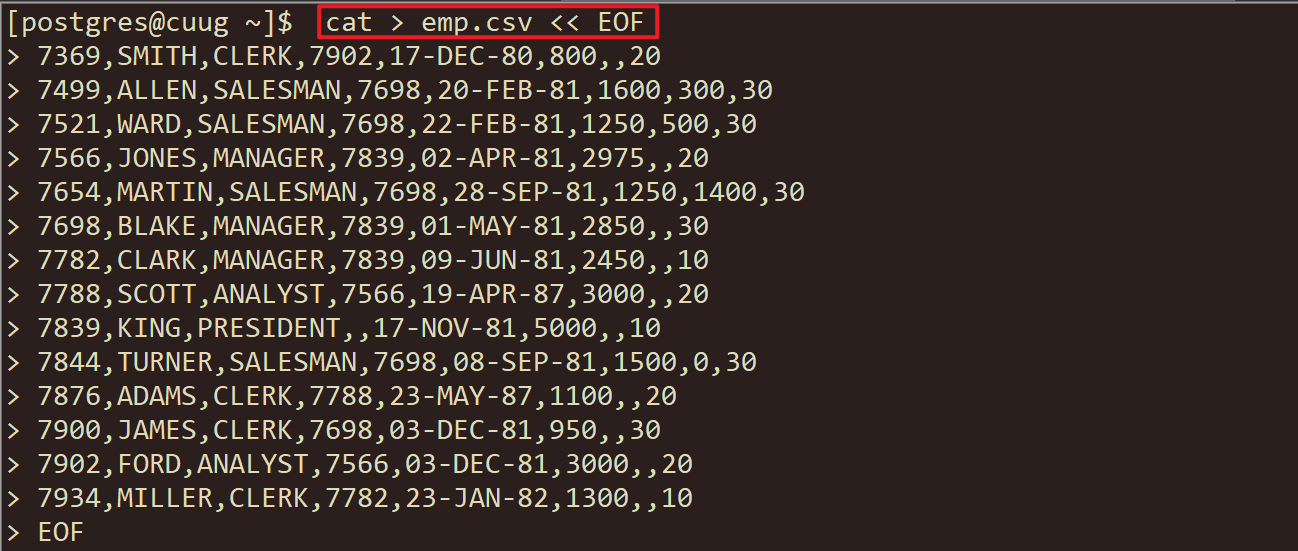
0.6. 用户user1创建表emp,把下面的文本数据导入到表中。
postgres> date
postgres> psql -U postgres -d testdb << EOF
\c - user1
CREATE TABLE emp (
    empno    NUMERIC,
    ename    VARCHAR(10),
    job        VARCHAR(9),
    mgr        NUMERIC,
    hiredate    DATE,
    sal        NUMERIC(7,2),
    comm    NUMERIC(7,2),
    deptno    NUMERIC(2)
);
EOF
postgres>  cat > emp.csv << EOF
7369,SMITH,CLERK,7902,17-DEC-80,800,,20
7499,ALLEN,SALESMAN,7698,20-FEB-81,1600,300,30
7521,WARD,SALESMAN,7698,22-FEB-81,1250,500,30
7566,JONES,MANAGER,7839,02-APR-81,2975,,20
7654,MARTIN,SALESMAN,7698,28-SEP-81,1250,1400,30
7698,BLAKE,MANAGER,7839,01-MAY-81,2850,,30
7782,CLARK,MANAGER,7839,09-JUN-81,2450,,10
7788,SCOTT,ANALYST,7566,19-APR-87,3000,,20
7839,KING,PRESIDENT,,17-NOV-81,5000,,10
7844,TURNER,SALESMAN,7698,08-SEP-81,1500,0,30
7876,ADAMS,CLERK,7788,23-MAY-87,1100,,20
7900,JAMES,CLERK,7698,03-DEC-81,950,,30
7902,FORD,ANALYST,7566,03-DEC-81,3000,,20
7934,MILLER,CLERK,7782,23-JAN-82,1300,,10
EOF
postgres>  psql -U postgres -d testdb << EOF
\copy emp from emp.csv csv;
table emp;
EOF
0.7. 使用pg_dump工具备份testdb数据库。
postgres> date
postgres>
 pg_dump -U postgres -d testdb -f /tmp/testdb.dmp -Fc
 pg_dump -U postgres -d testdb -f /tmp/testdb.sql -Fp
ls /tmp/testdb.dmp
file /tmp/testdb.dmp

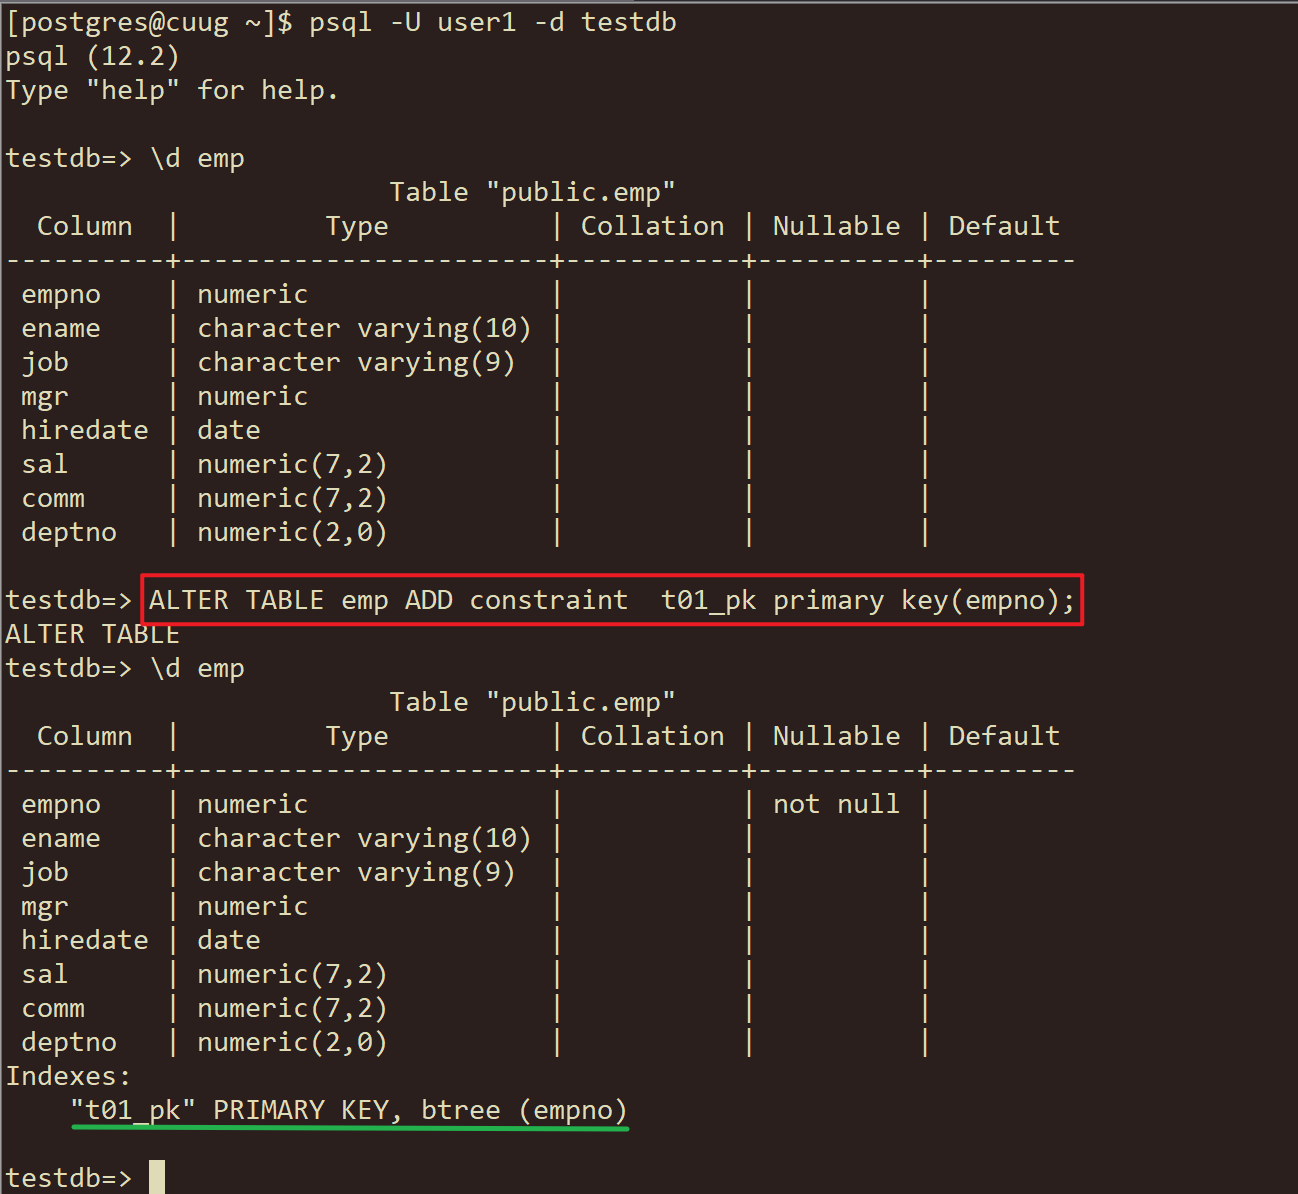
0.8. 用户user1在emp上的第一个列上创建主键约束。
postgresql> date
postgresql> psql -U user1 -d testdb << EOF
\d emp
ALTER TABLE emp ADD constraint  t01_pk primary key(empno);
\d emp
EOF
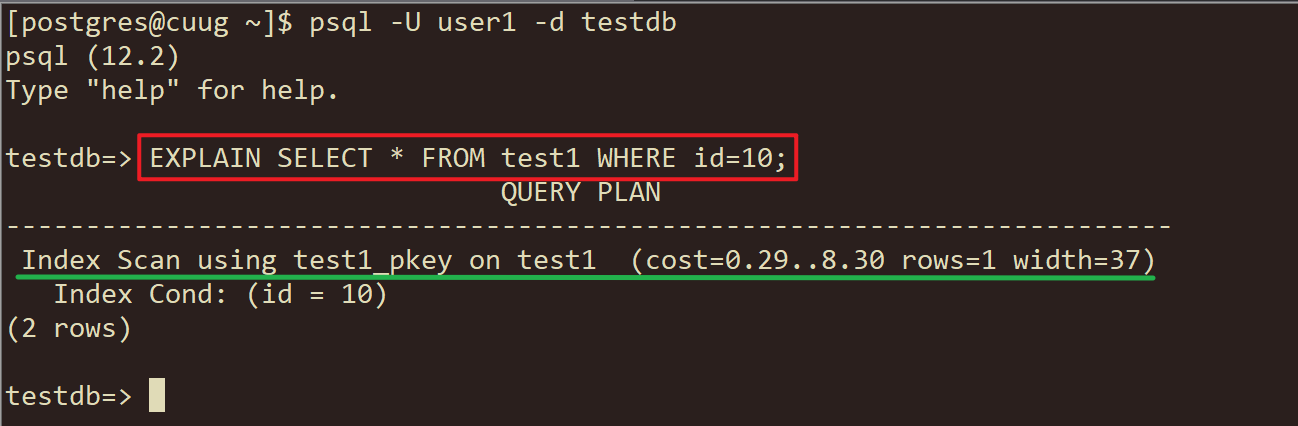
0.9. 打印select * from test1 where id=10;的执行计划。
postgresql> date
postgresql> psql -U user1 -d testdb << EOF
EXPLAIN SELECT * FROM test1 WHERE id=10;
EOF
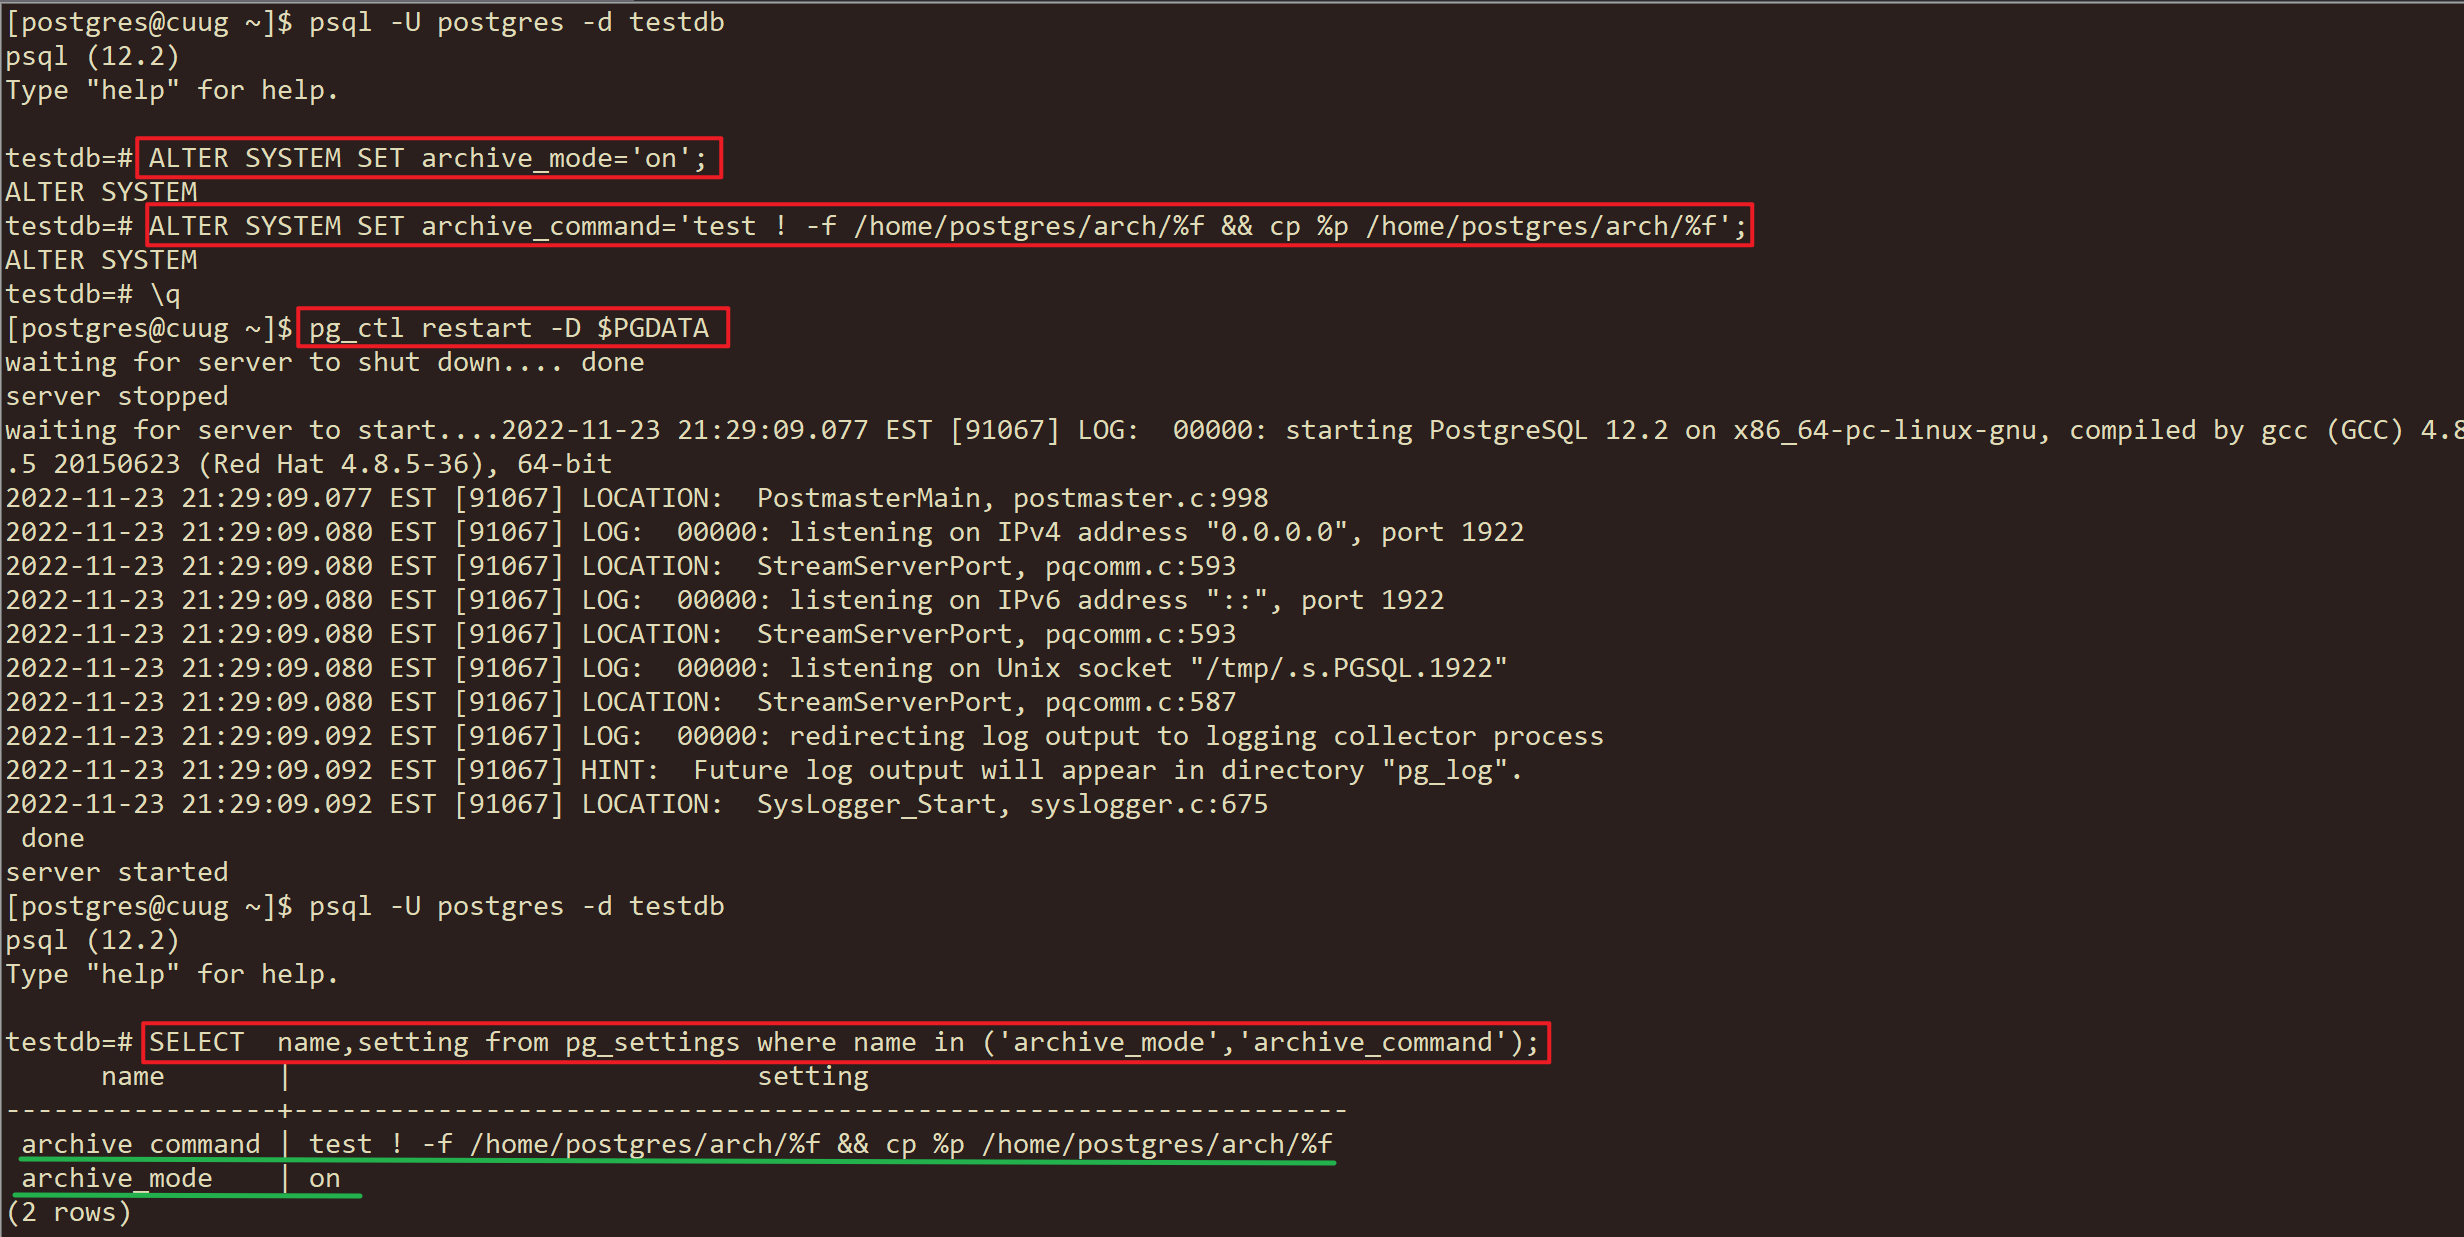
0.10. 把数据库改变成归档模式,归档日志存放在/home/postgres/arch目录下。
postgres>
date
mkdir -p /home/postgres/arch
psql -U postgres -d testdb << EOF
ALTER SYSTEM SET archive_mode='on';
ALTER SYSTEM SET archive_command='test ! -f /home/postgres/arch/%f && cp %p /home/postgres/arch/%f';
\q
EOF
postgres>
pg_ctl restart -D $PGDATA
psql -U postgres -d testdb << EOF
SELECT  name,setting from pg_settings where name in ('archive_mode','archive_command');
\! ls /home/postgres/arch
SELECT pg_switch_wal();
\! ls /home/postgres/arch
EOF

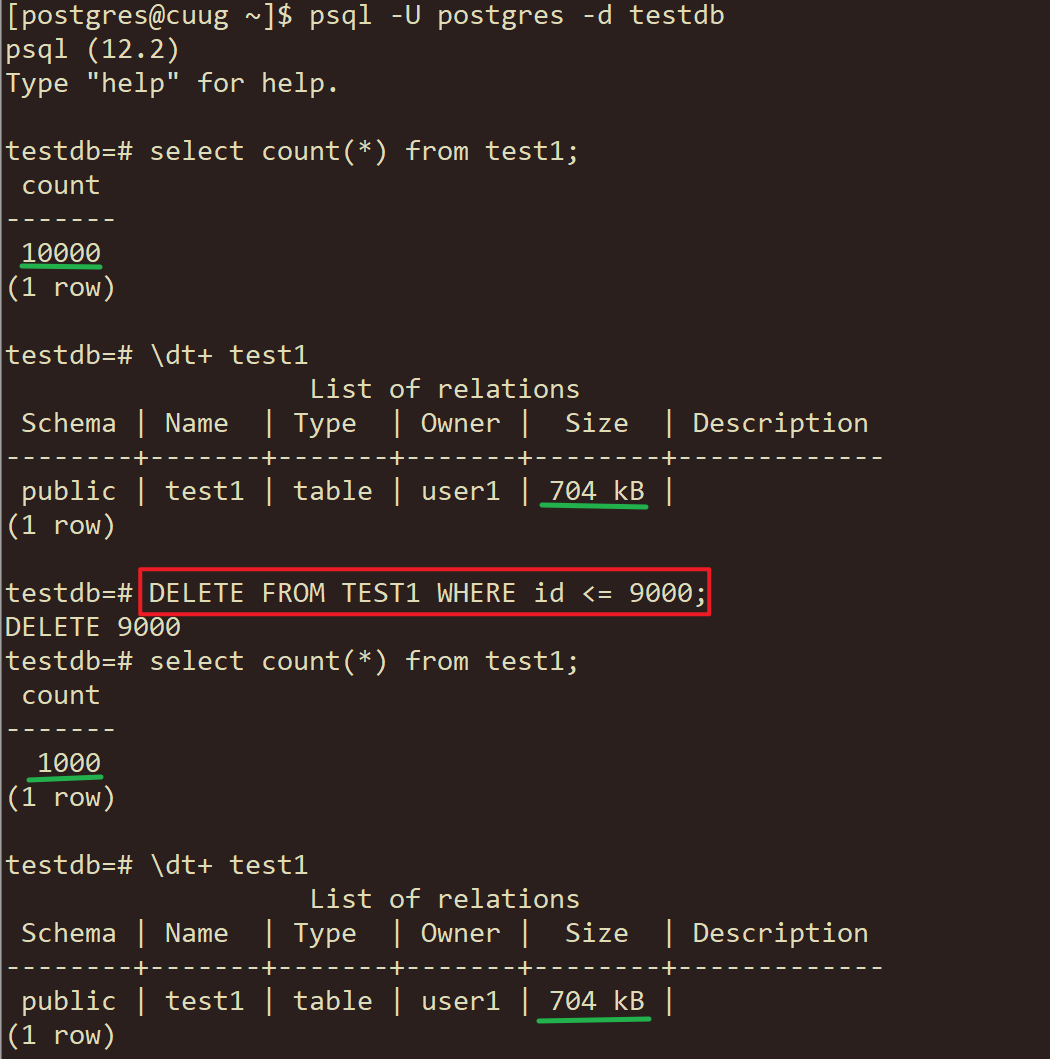
0.11. 使用delete命令删除test1表中id小于9000的行,然后要求缩小表数据文件的尺寸。
postgres>
date
psql -U postgres -d testdb << EOF
select count(*) from test1;
\dt+ test1
DELETE FROM TEST1 WHERE id <= 9000;
select count(*) from test1;
\dt+ test1
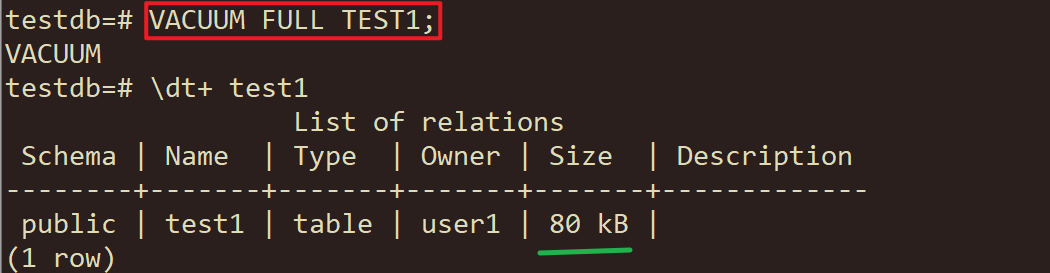
VACUUM FULL TEST1;
\dt+ test1
EOF
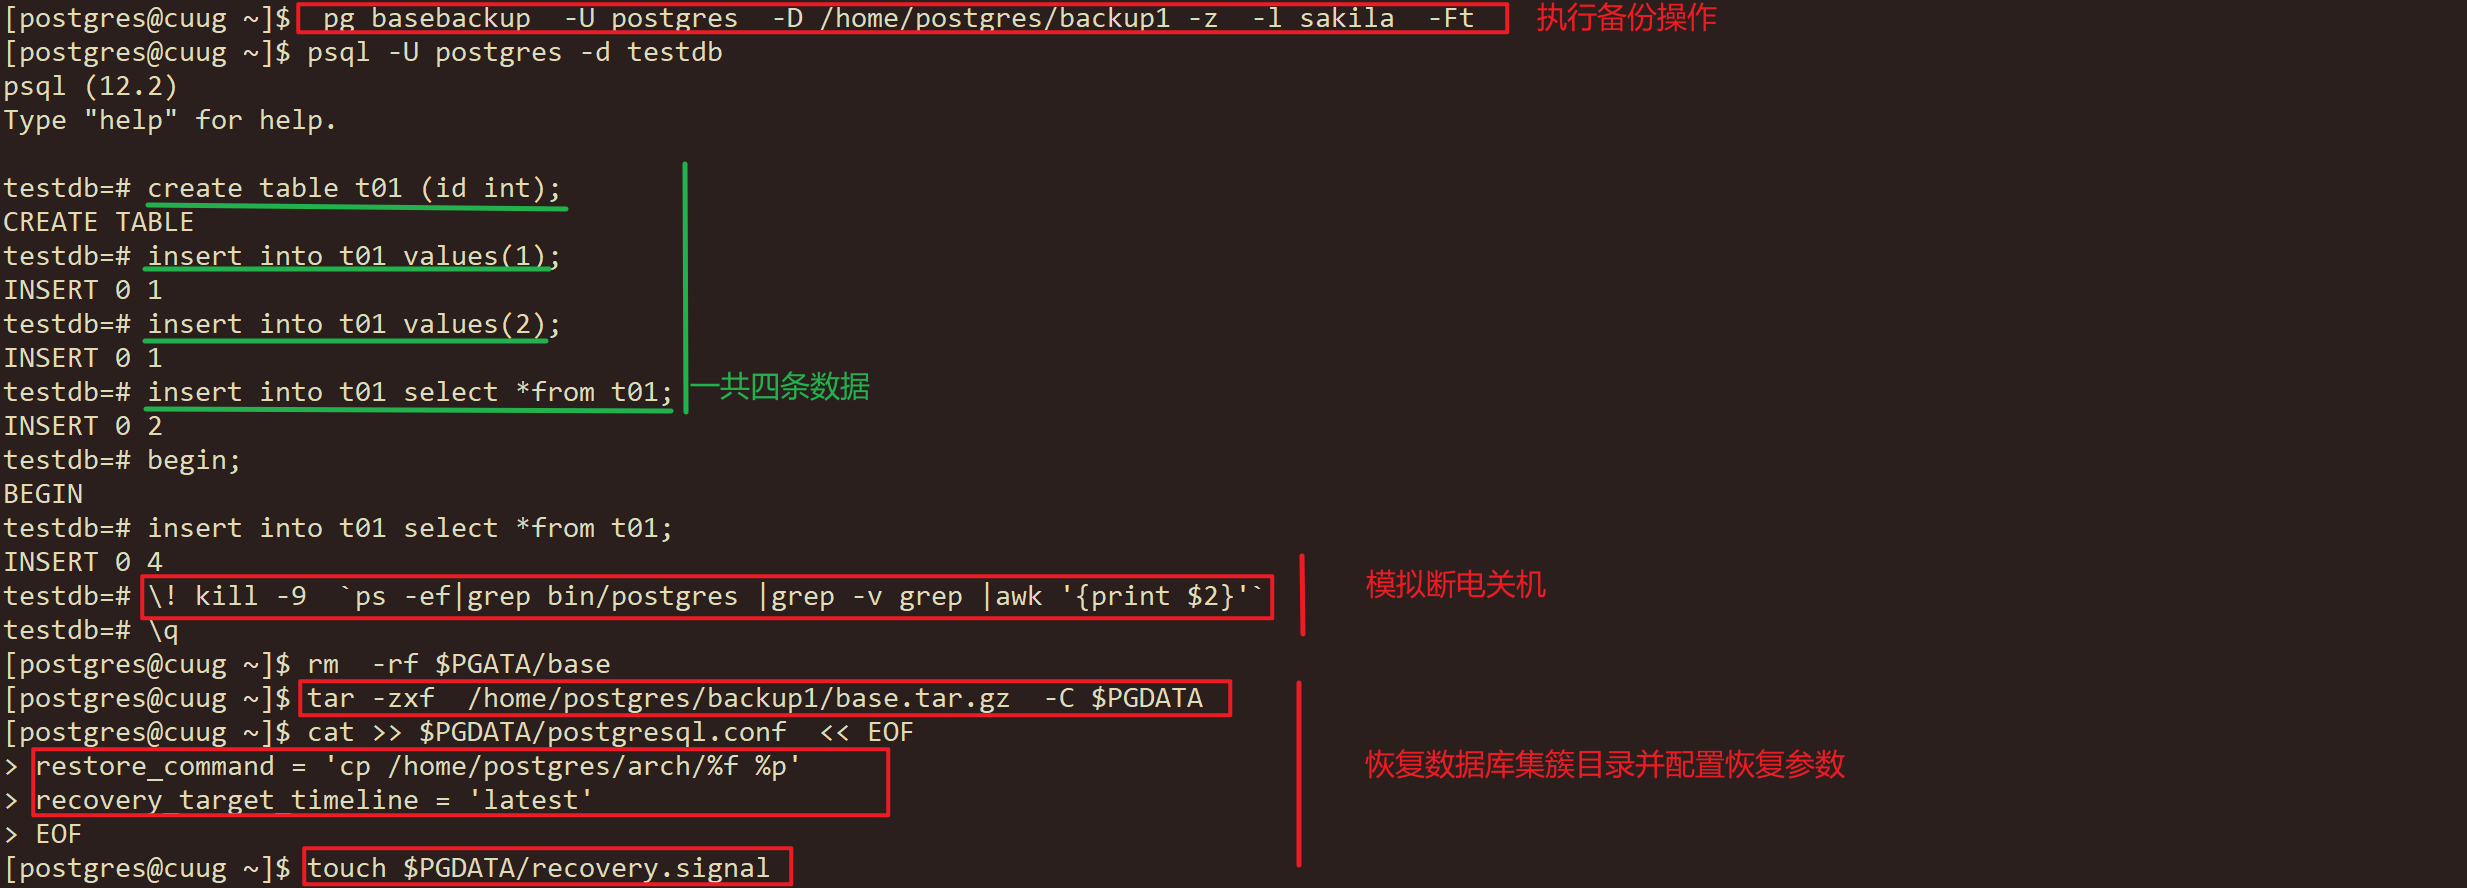
0.12. 用pg_basebackup对数据库做一个备份,并进行完全恢复
- 开启归档
PostgreSQL 备份与恢复#开启归档 - 备份整个数据库
postgresql> rm -rf /home/postgres/backup1/*
 pg_basebackup  -U postgres  -D /home/postgres/backup1 -z  -l sakila  -Ft
- 业务模拟
postgresql> psql -U postgres -d testdb  << EOF
create table t01 (id int);
insert into t01 values(1);
insert into t01 values(2);
insert into t01 select *from t01;
begin;
insert into t01 select *from t01;
EOF
- 主机断电,导致$PGDATA/base损坏
kill -9 `ps -ef|grep bin/postgres |grep -v grep |awk '{print $2}'`
- 恢复base 表空间
rm  -rf $PGATA/base
tar -zxf  /home/postgres/backup1/base.tar.gz  -C $PGDATA
- 指定数据库恢复参数
postgres> cat >> $PGDATA/postgresql.conf  << EOF
restore_command = 'cp /home/postgres/arch/%f %p'
recovery_target_timeline = 'latest'
EOF
postgres>  touch $PGDATA/recovery.signal
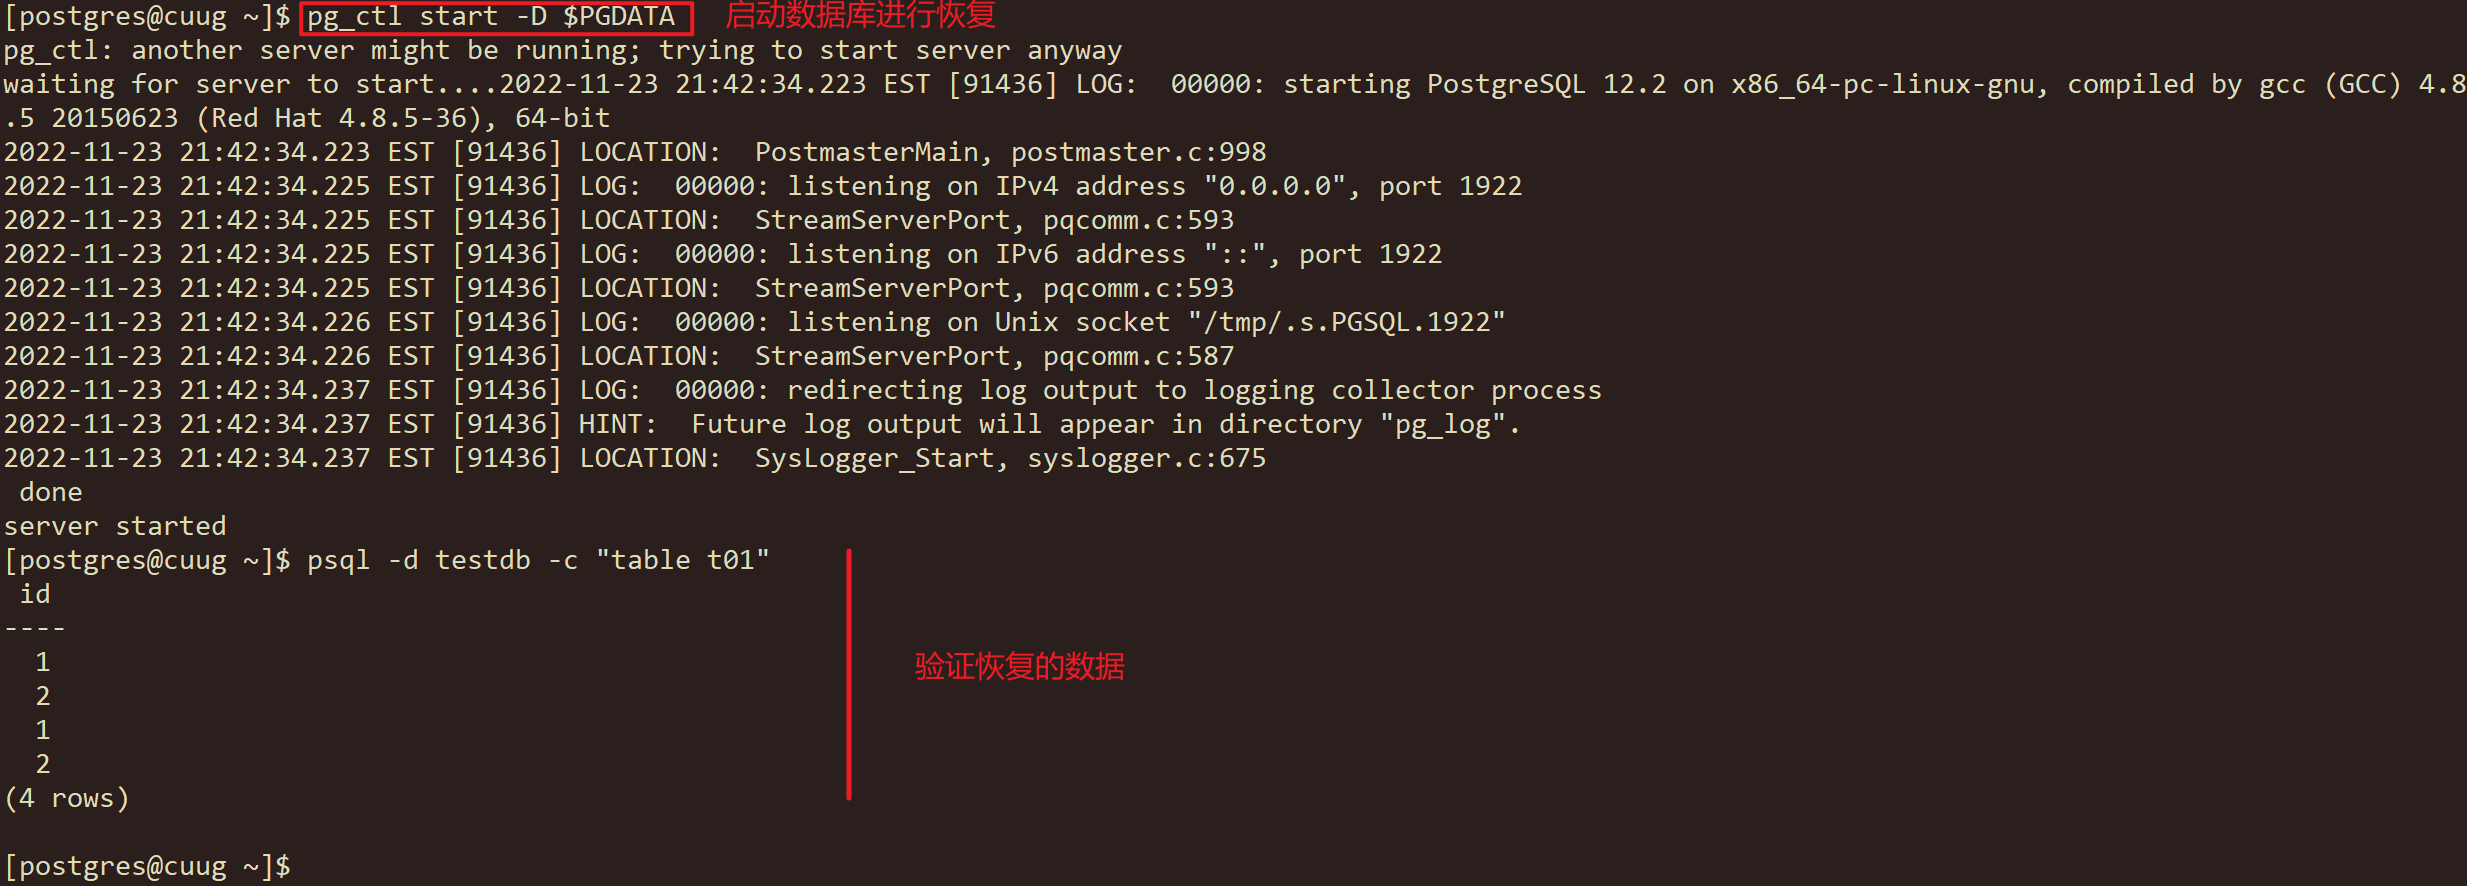
- 启动数据库,自动恢复,验证数据完整性。
postgres> pg_ctl start -D $PGDATA
postgres> psql -d testdb -c "table t01"
//四条记录。
- 删除参数
postgres> vi $PGDATA/postgresql.conf
Warning
删除 restore_command 和recovery_target_timeline这两个参数,防止下次数据恢复的时候会有参数冲突。
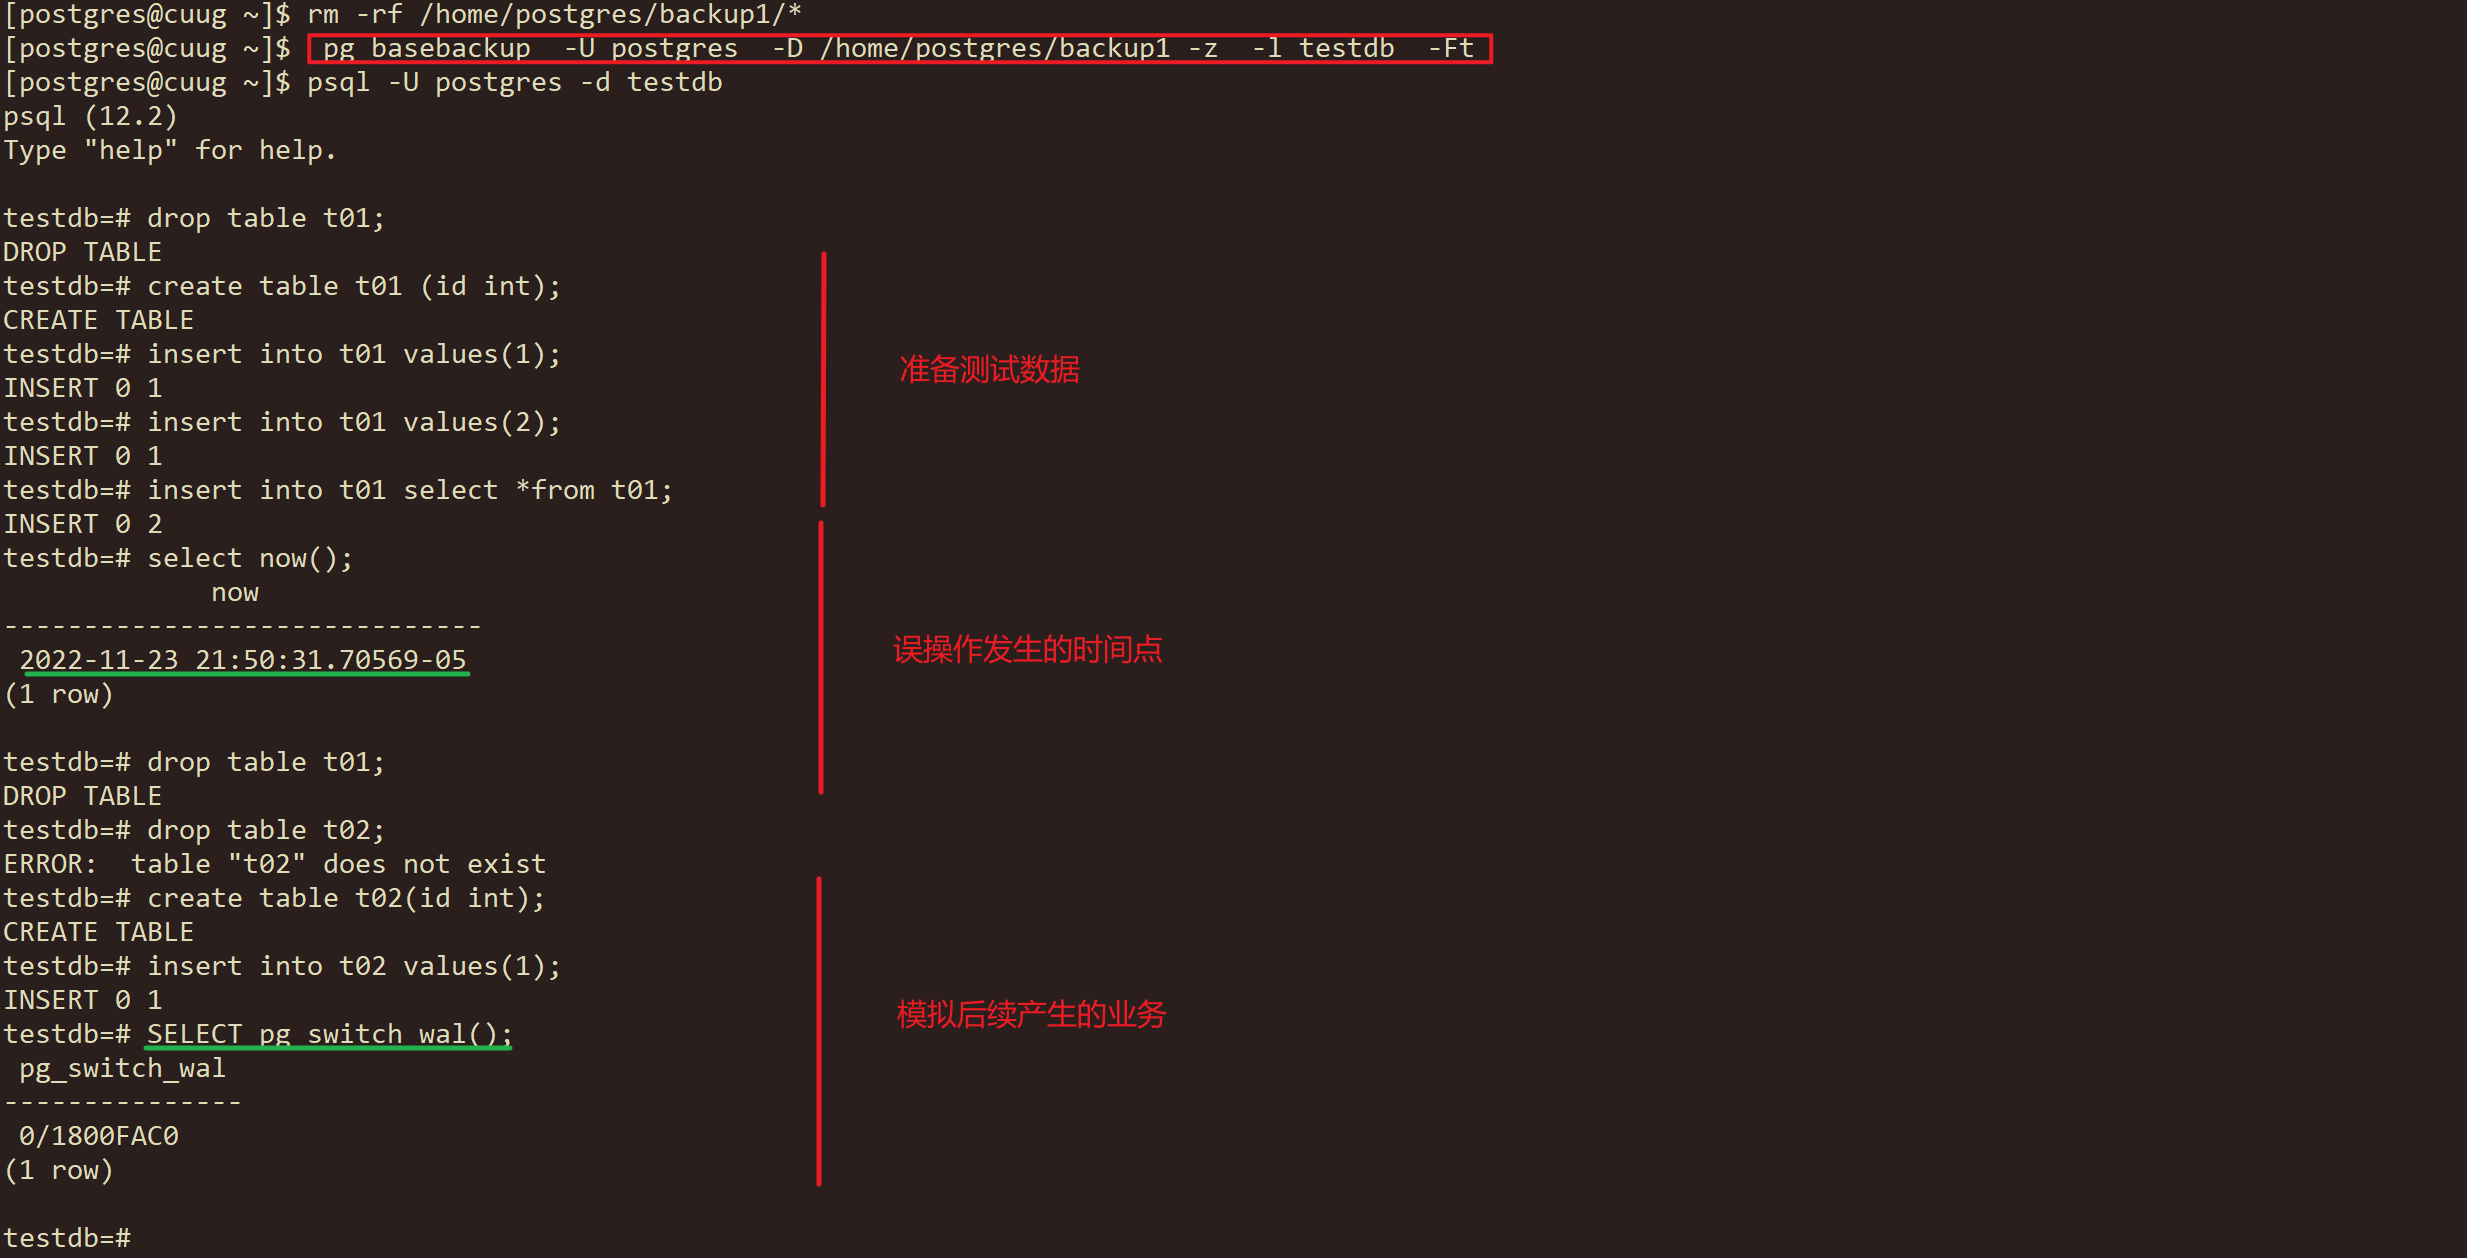
0.13. 用pg_basebackup对数据库做一个备份,并进行时间点恢复
- 开启归档
PostgreSQL 备份与恢复#开启归档 - 备份整个数据库
postgresql> rm -rf /home/postgres/backup1/*
 pg_basebackup  -U postgres  -D /home/postgres/backup1 -z  -l testdb  -Ft
- 业务模拟
postgresql> psql -U postgres -d testdb << EOF
drop table t01;
create table t01 (id int);
insert into t01 values(1);
insert into t01 values(2);
insert into t01 select *from t01;
select now();
drop table t01;
drop table t02;
create table t02(id int);
insert into t02 values(1);
SELECT pg_switch_wal();
EOF
Warning
取出时间点
now
2022-11-23 21:50:31.70569-05
(1 row)
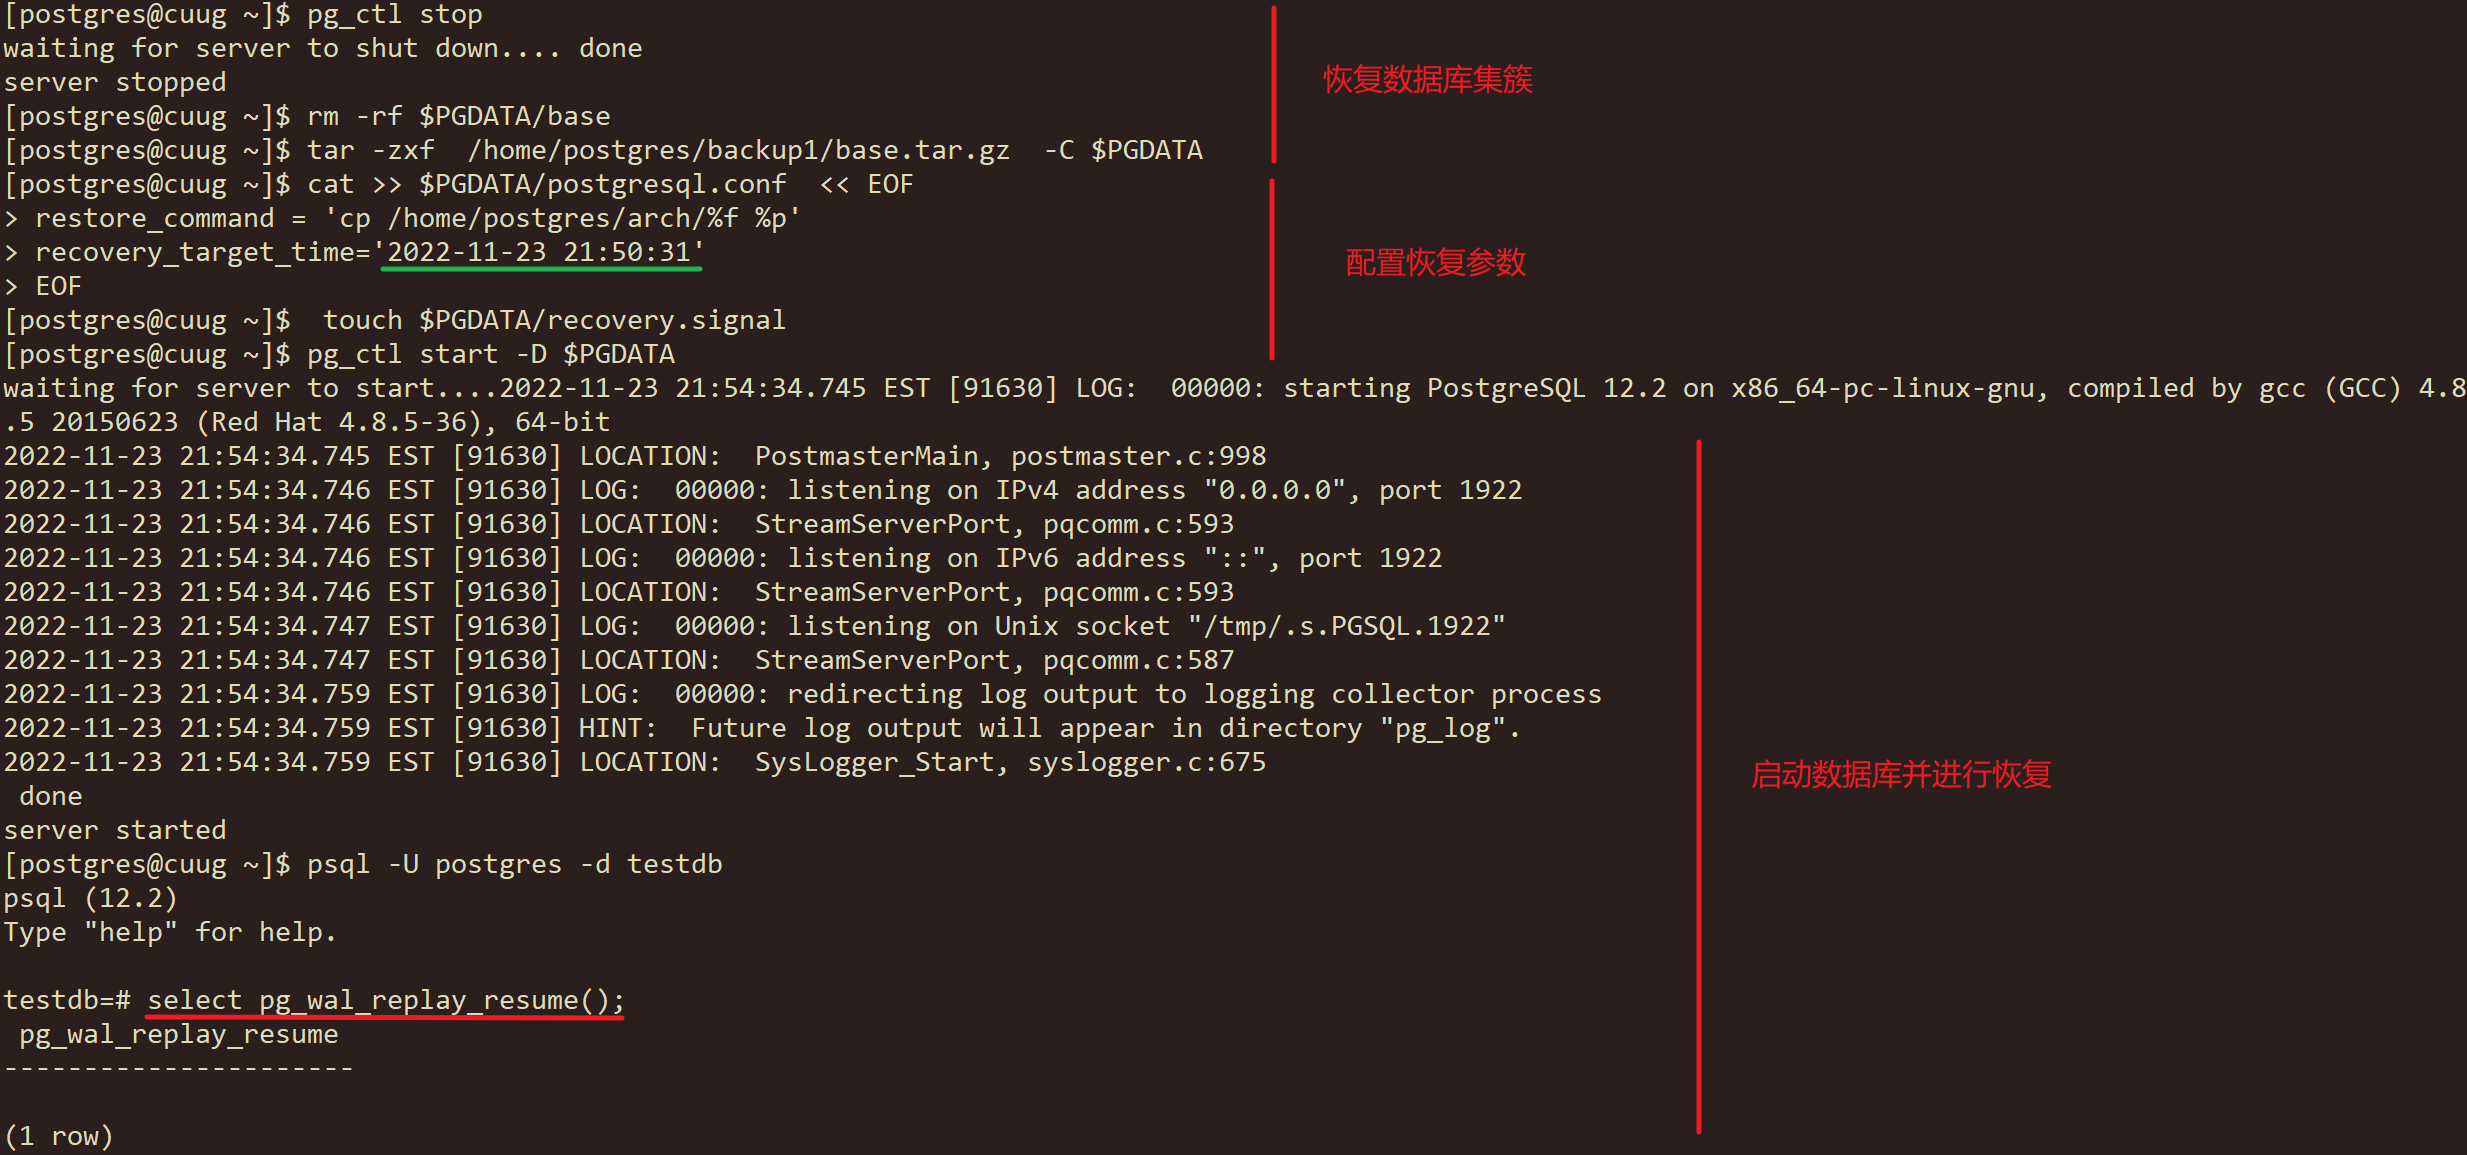
- 停止数据库
pg_ctl stop
rm -rf $PGDATA/base
- 恢复base 表空间
tar -zxf /home/postgres/backup1/base.tar.gz -C $PGDATA
- 指定数据库恢复参数
postgres> cat >> $PGDATA/postgresql.conf  << EOF
restore_command = 'cp /home/postgres/arch/%f %p'
recovery_target_time='2022-11-23 21:50:31'
EOF
postgres>  touch $PGDATA/recovery.signal
- 启动数据库,自动恢复,验证数据完整性。
postgres> pg_ctl start -D $PGDATA
- 恢复数据库
postgresql> psql -U postgres -d testdb << EOF
select pg_wal_replay_resume();
EOF
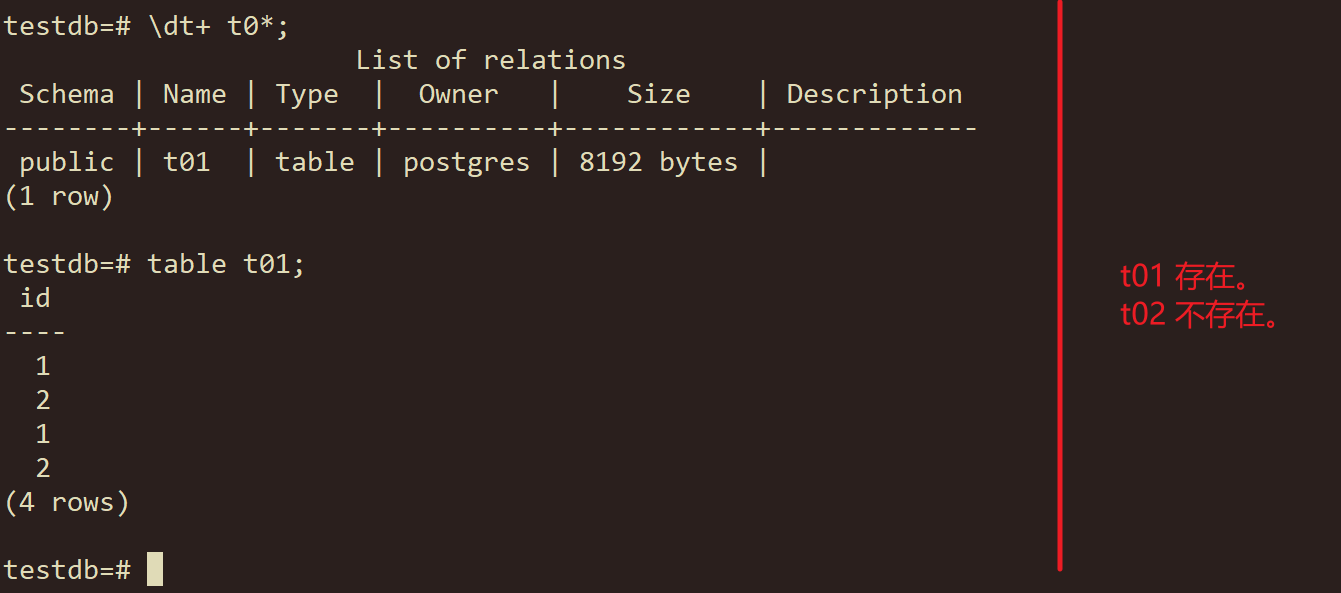
- 验证是否恢复
postgresql> psql -U postgres -d testdb
\dt+ t0*;
table t01;
- 删除参数
postgres> vi $PGDATA/postgresql.conf
删除 restore_command 和recovery_target_timeline这两个参数,防止下次数据恢复的时候会有参数冲突。
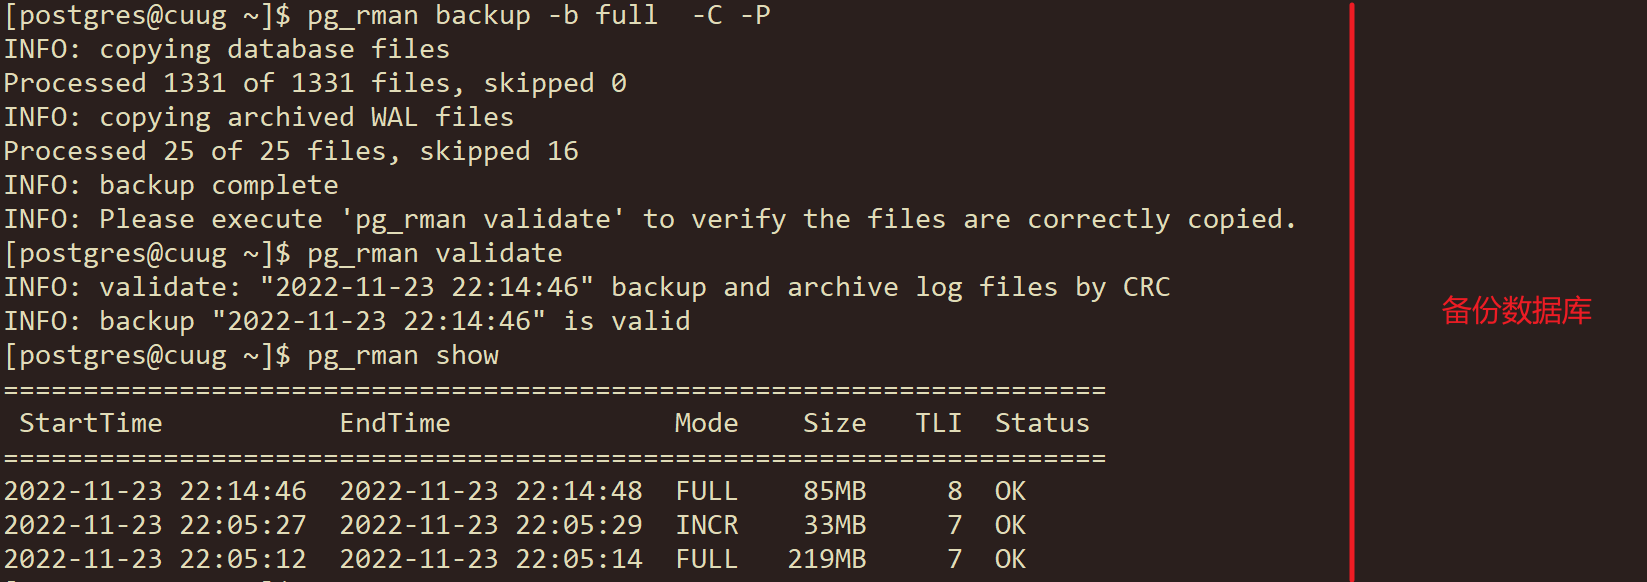
0.14. 部署pg_rman,并对数据库进行备份
0.14.1. pg_rman 部署
- 下载并安装和编译
postgres>
tar -zxf /soft/pg_rman-1.3*.tar.gz -C /soft
cd /soft/pg_rman-*/
make && make install
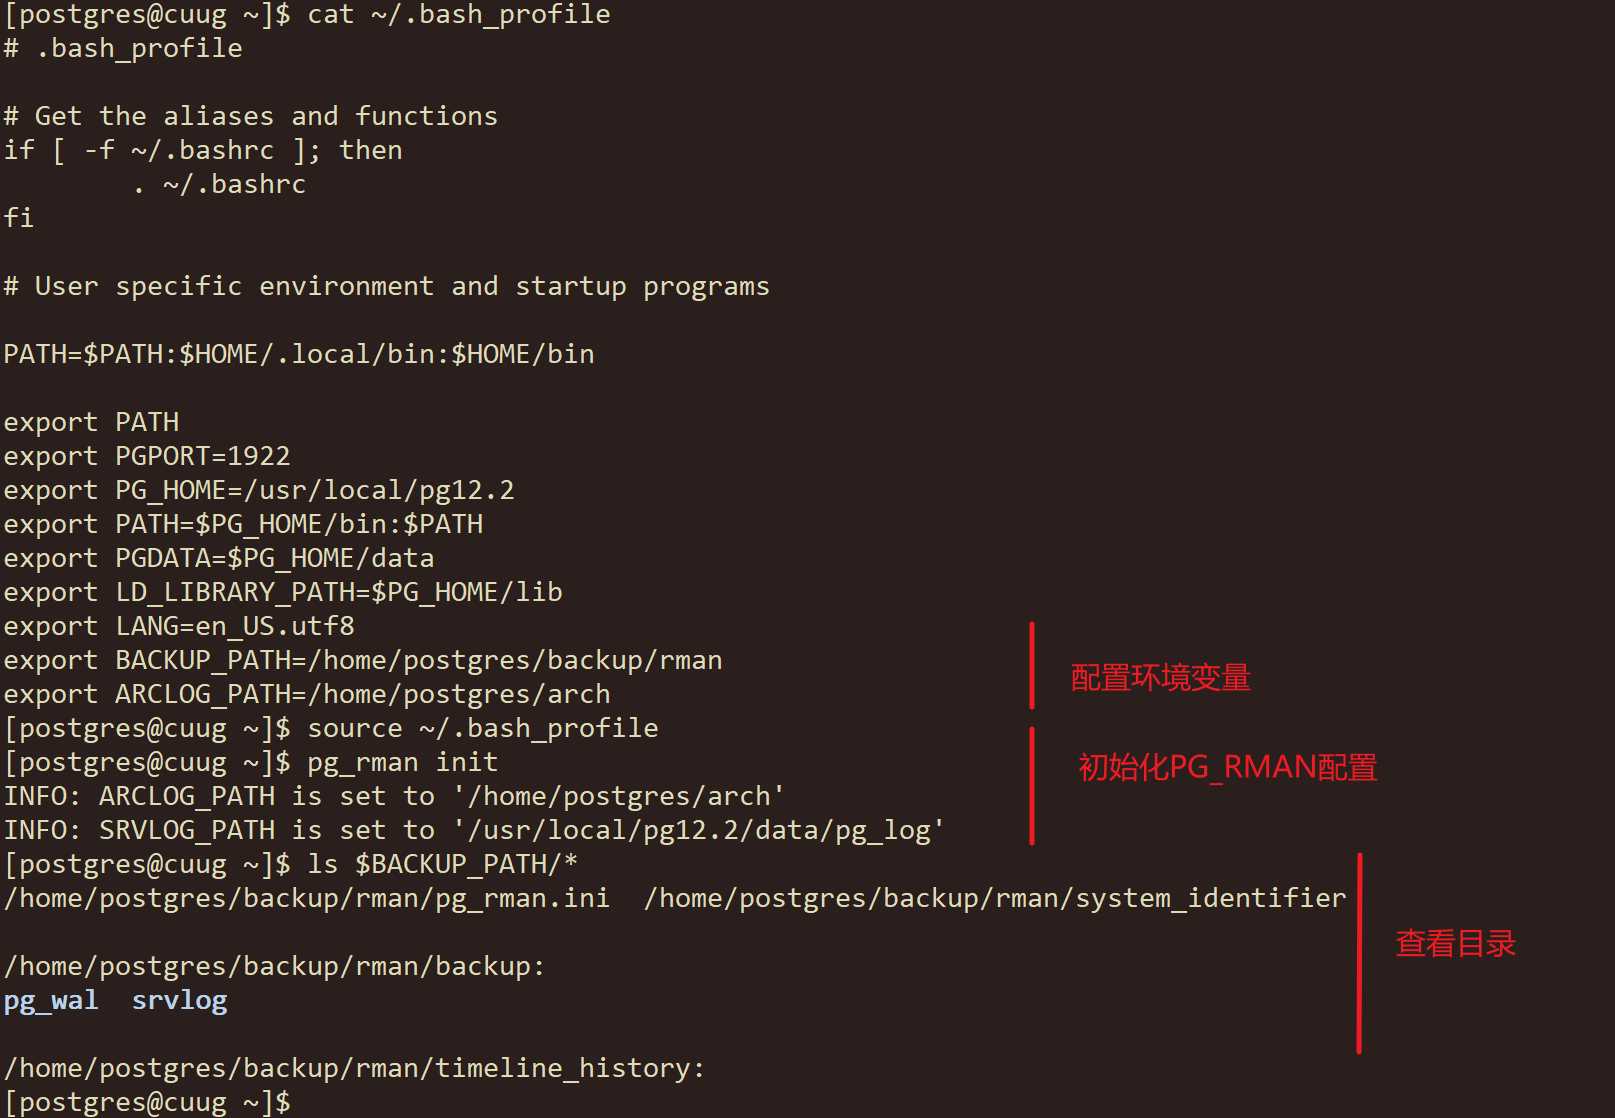
- 设置环境变量
postgres>
cat >> ~/.bash_profile << EOF
export BACKUP_PATH=/home/postgres/backup/rman
export ARCLOG_PATH=/home/postgres/arch
EOF
source ~/.bash_profile
- 初始化pg_rman
[postgres@node1 pg_rman-1.3.14-pg12]$ pg_rman init
--------------------------------------output:-------------------------------

INFO: ARCLOG_PATH is set to '/home/postgres/arch'
INFO: SRVLOG_PATH is set to '/usr/local/pg12.2/data/log'
- 查看初始化后的文件。
Note
ls $BACKUP_PATH/*
Warning
特别注意:在备份前请手动清除postgresql.conf中的restore_command、recovery_target_time、recovery_target_timeline等参数
0.14.2. PG_RAMN备份
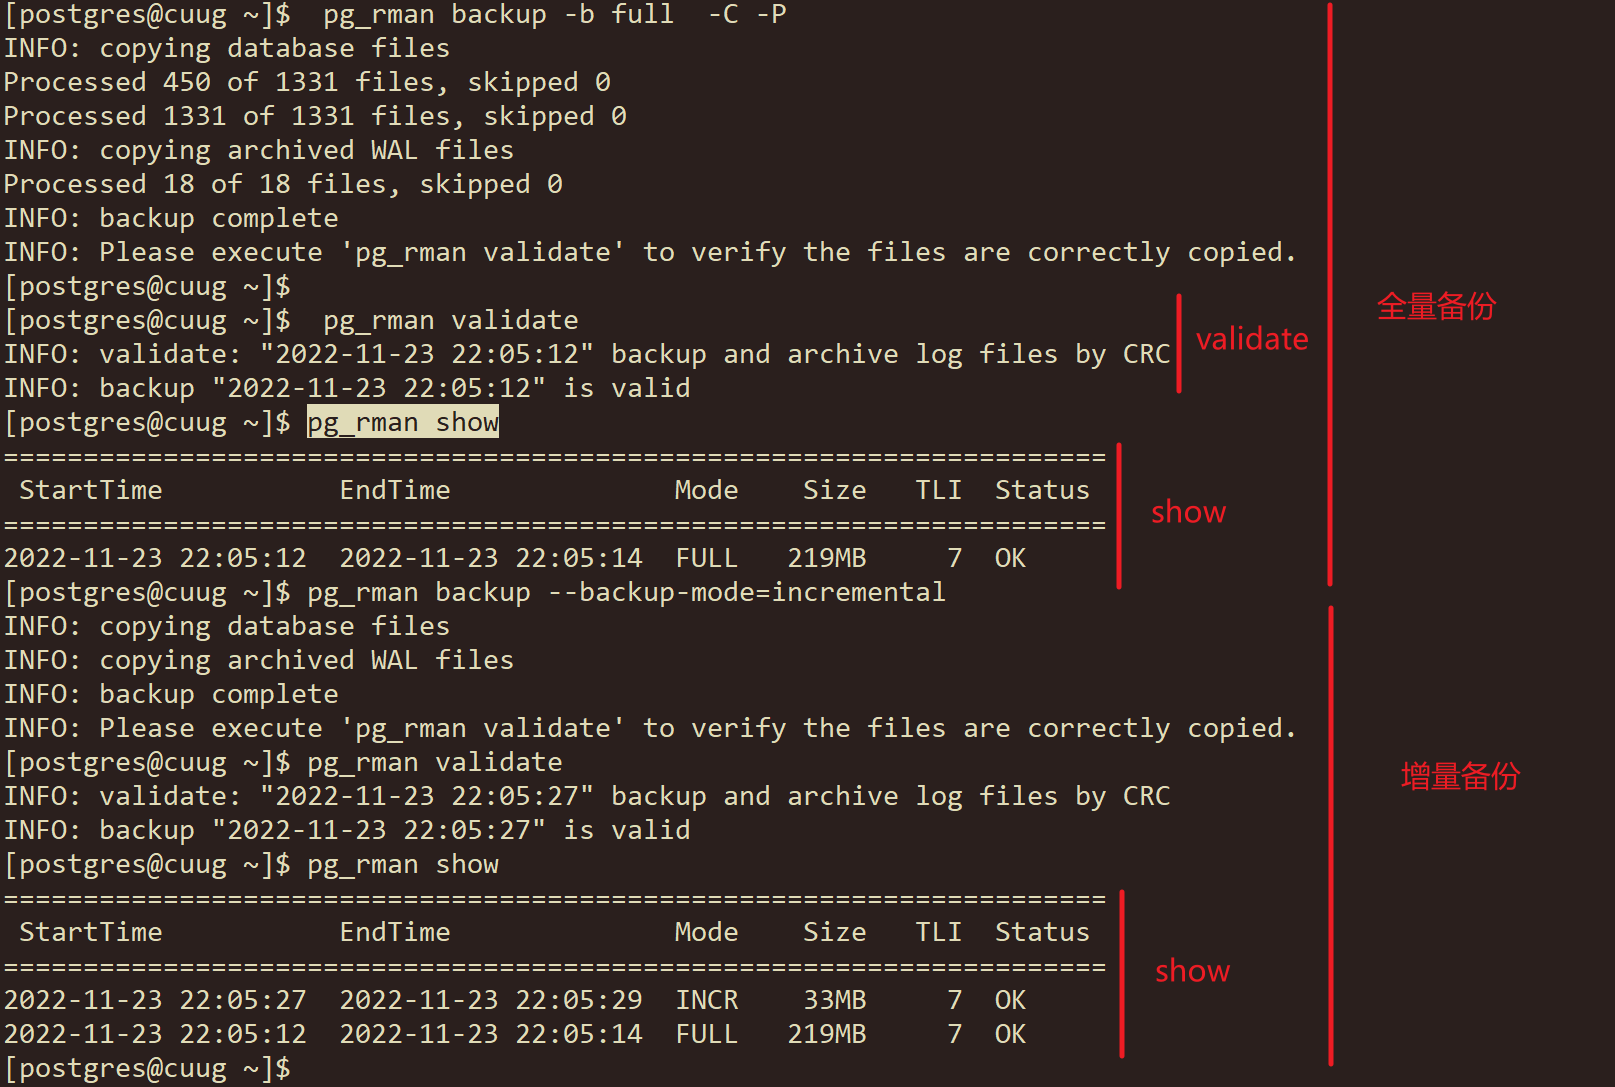
- PG_RMAN 全备份
pg_rman backup -b full -C -P
- 验证备份有效性
pg_rman validate
- 查看备份
pg_rman show
- 增量备份
pg_rman backup --backup-mode=incremental
0.15. 用pg_rman做一个完全恢复
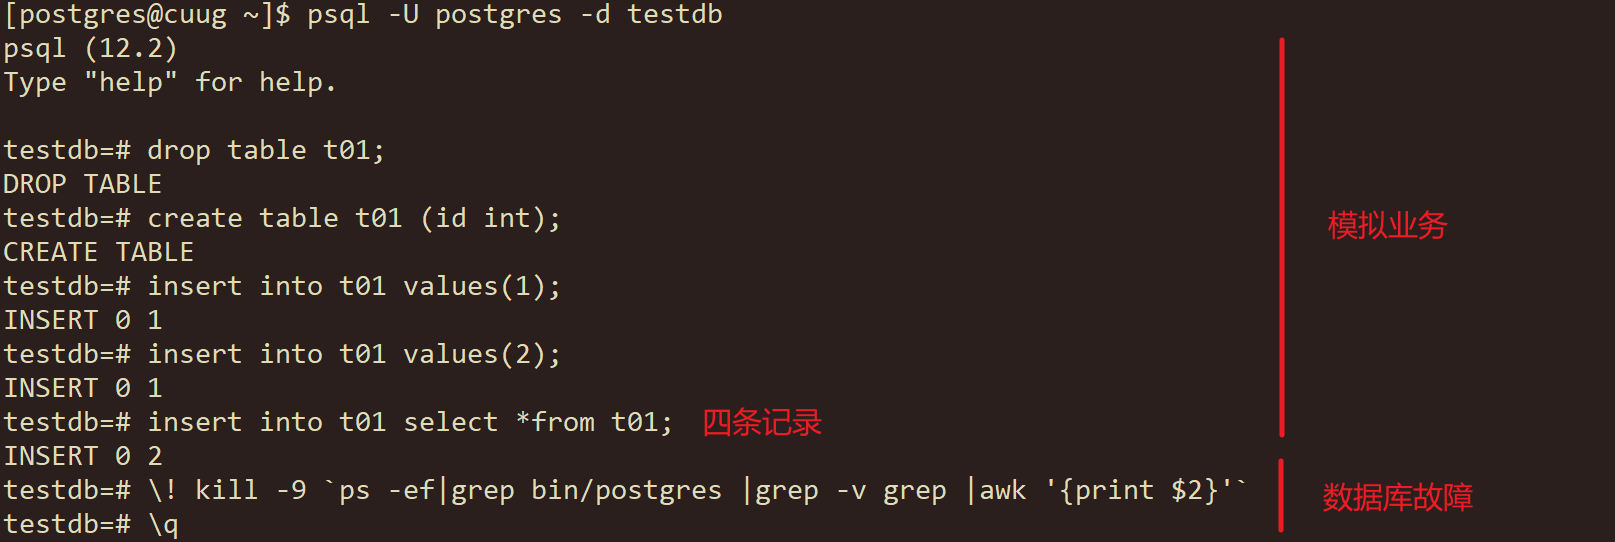
1 业务模拟
postgresql> psql -U postgres -d testdb << EOF
drop table t01;
create table t01 (id int);
insert into t01 values(1);
insert into t01 values(2);
insert into t01 select *from t01;
EOF
- 实例崩溃
kill -9 `ps -ef|grep bin/postgres |grep -v grep |awk '{print $2}'`
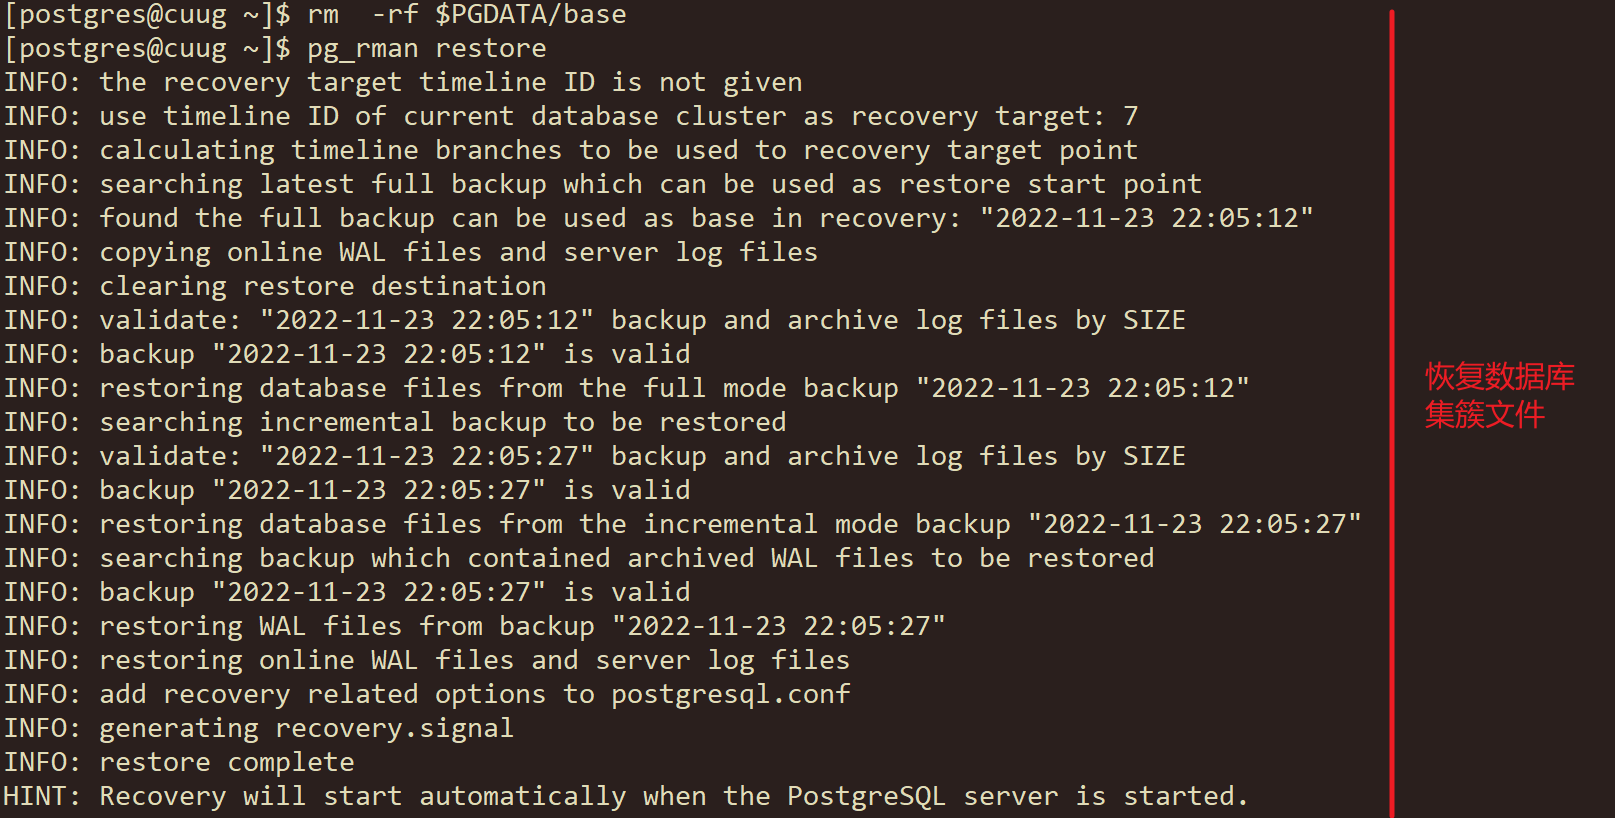
rm -rf $PGDATA/base
- 恢复数据库文件。
pg_rman restore
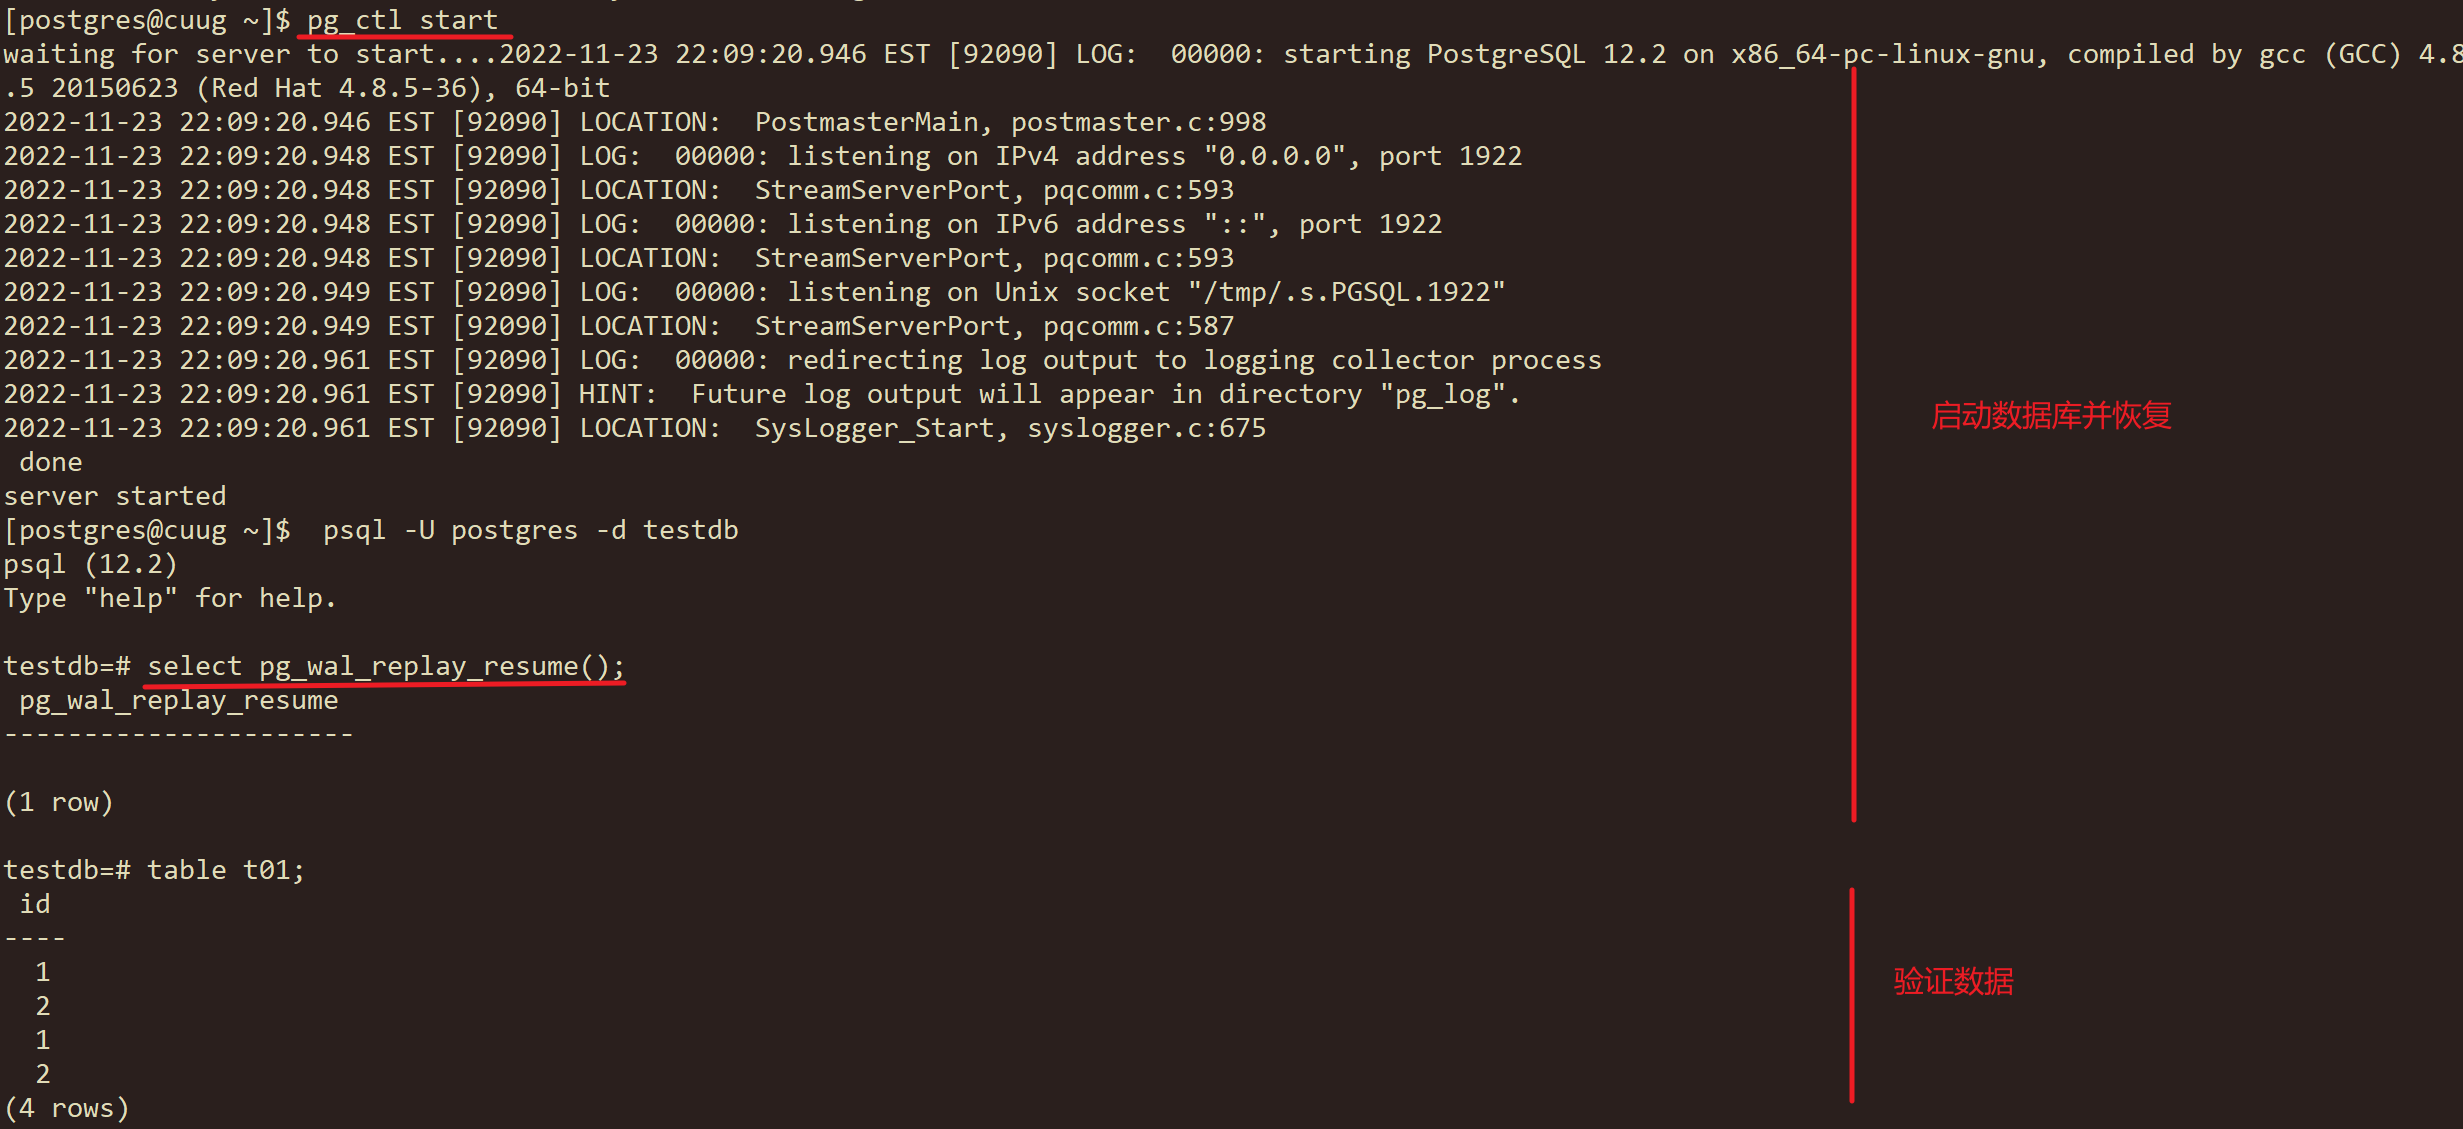
- 启动数据库。
pg_ctl start
- 前滚redo log
postgresql> psql -U postgres -d testdb << EOF
select pg_wal_replay_resume();
EOF
- 验证结果
psql testdb -c 'table t01';
Warning
注意:$PGDATA/pg_wal下的日志文件不能丢失,否则要做不完全恢复
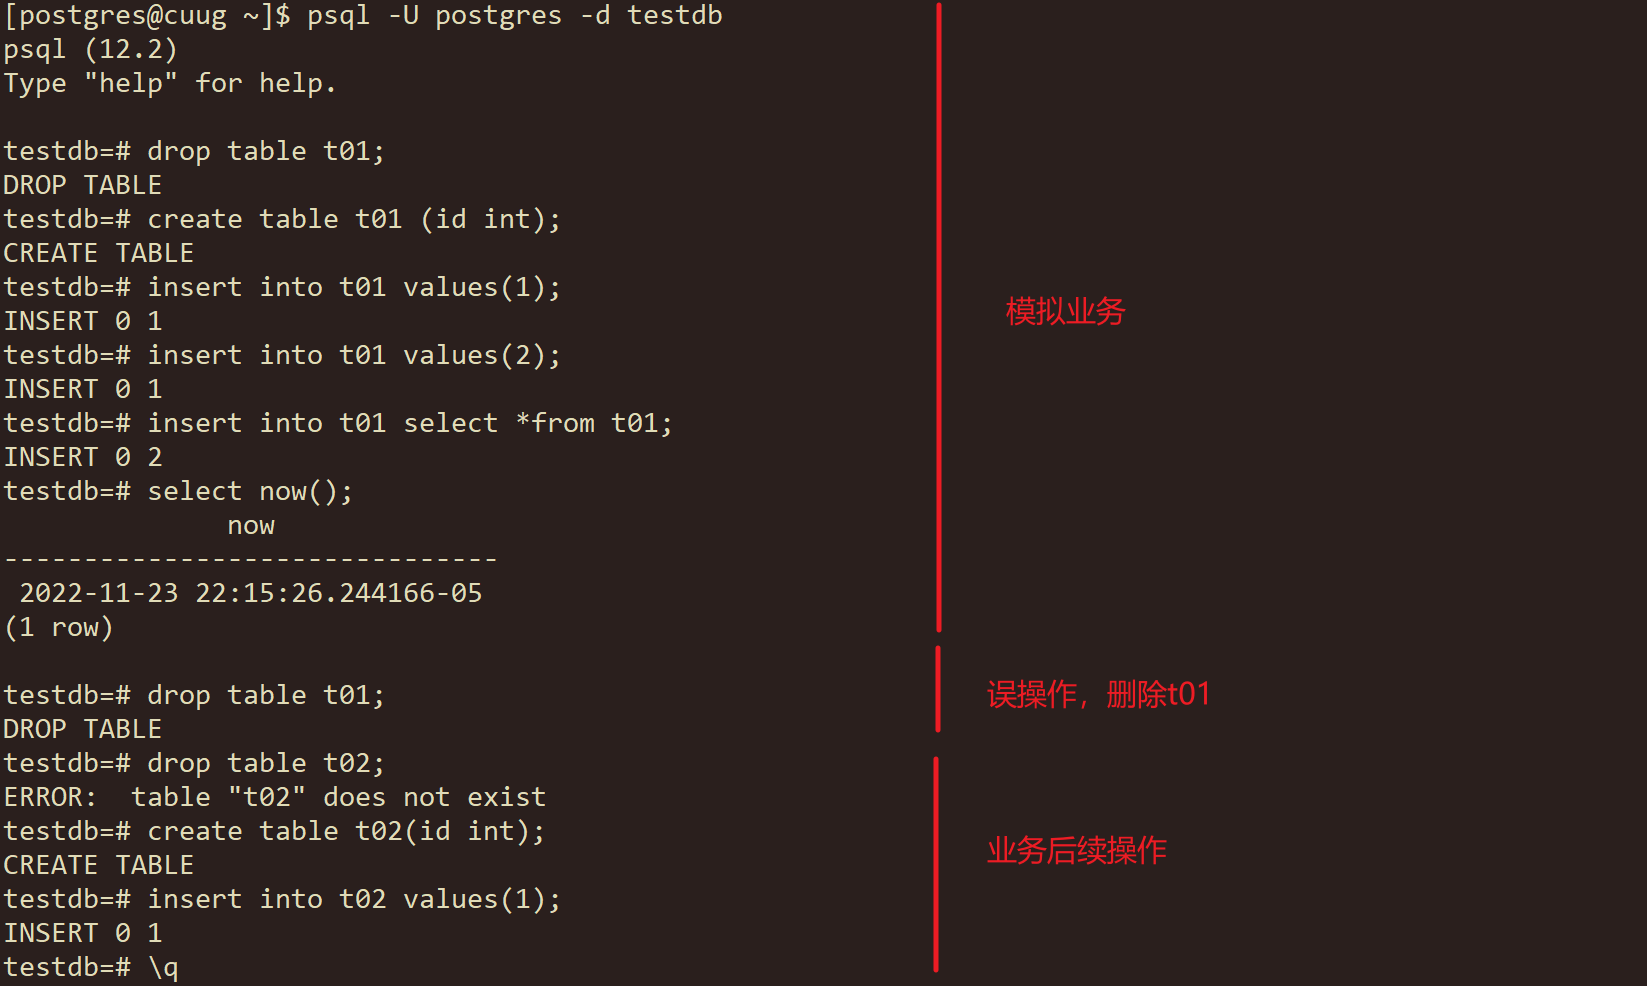
0.16. 用pg_rman做一个时间点恢复
- 开启归档
PostgreSQL 备份与恢复#开启归档 - 备份整个数据库
postgresql> pg_rman backup -b full -C -P
- 业务模拟,误删除表
postgresql> psql -U postgres -d testdb << EOF
drop table t01;
create table t01 (id int);
insert into t01 values(1);
insert into t01 values(2);
insert into t01 select *from t01;
select now();
drop table t01;
drop table t02;
create table t02(id int);
insert into t02 values(1);
EOF
Note
now
2022-11-26 03:07:02.611232-05
- 清除数据文件
postgresql>
pg_ctl stop
rm  -rf $PGDATA/base
- 恢复数据库文件。
postgresql>
pg_rman restore --recovery-target-time='2022-11-26 03:07:02'
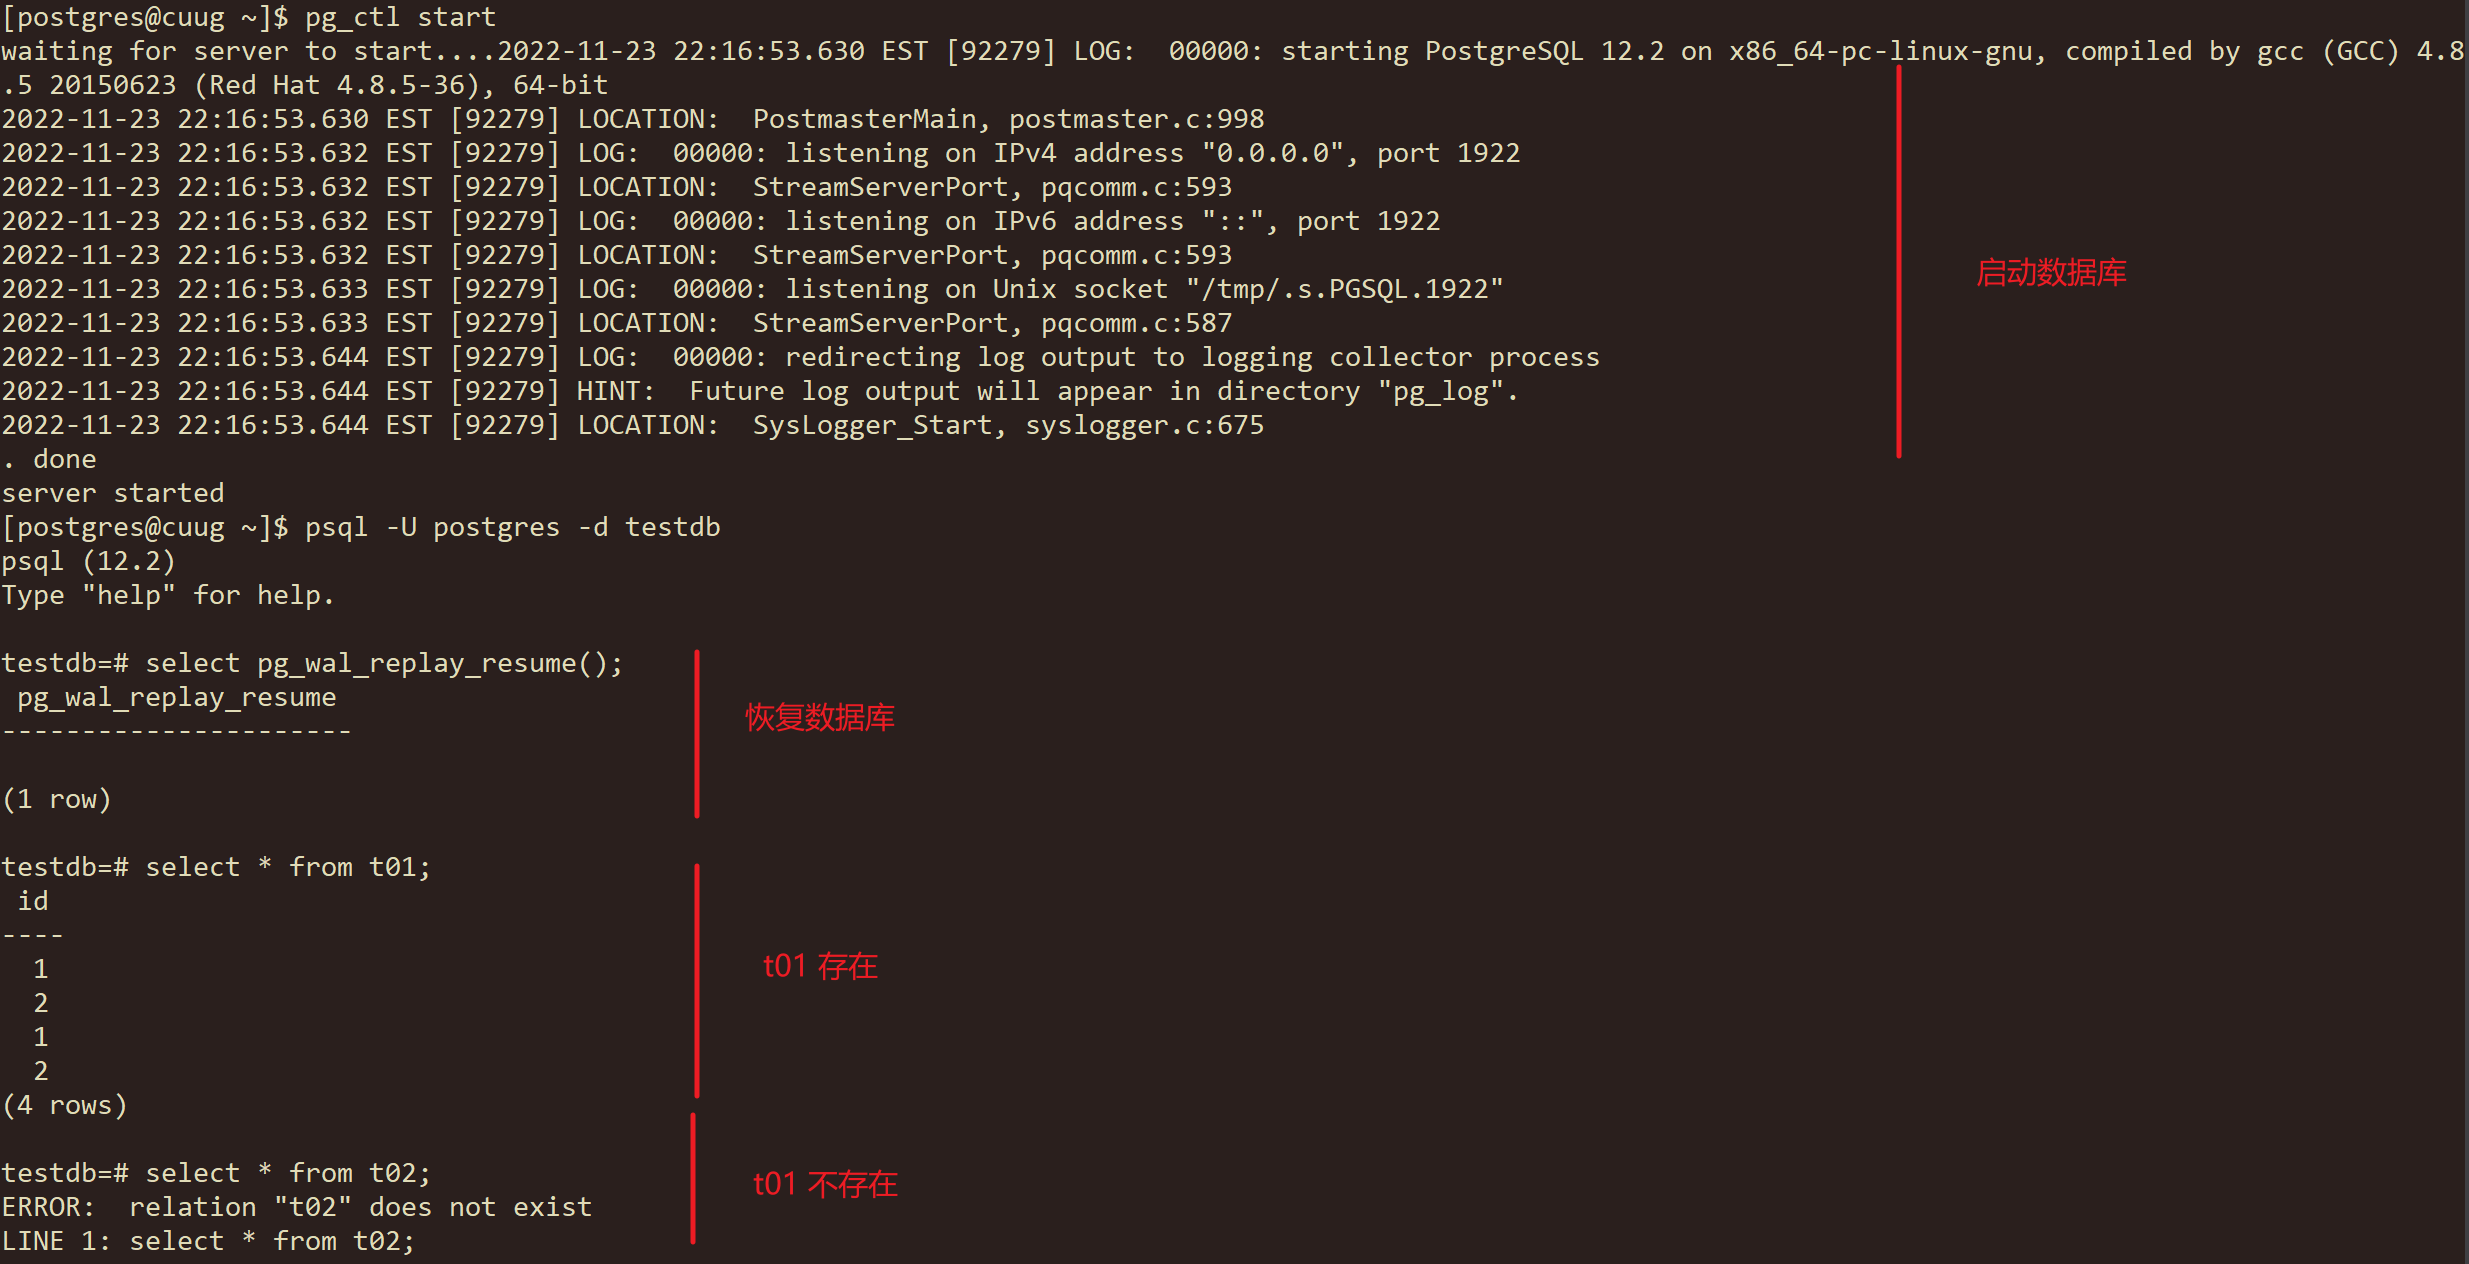
- 启动数据库。
postgresql>
pg_ctl start
- 验证数据t01 是否被恢复。
postgresql>
psql -U postgres -d testdb <<eof
select pg_wal_replay_resume();
select * from t01;
select * from t02;
eof
Warning
4. 前滚redo log语句暂时就不需要了 ,因为指定了recovery-target-action ,自动恢复到指定的时间点。
select pg_wal_replay_resume();
注意:$PGDATA/pg_wal下的日志文件不能丢失,否则要做不完全恢复

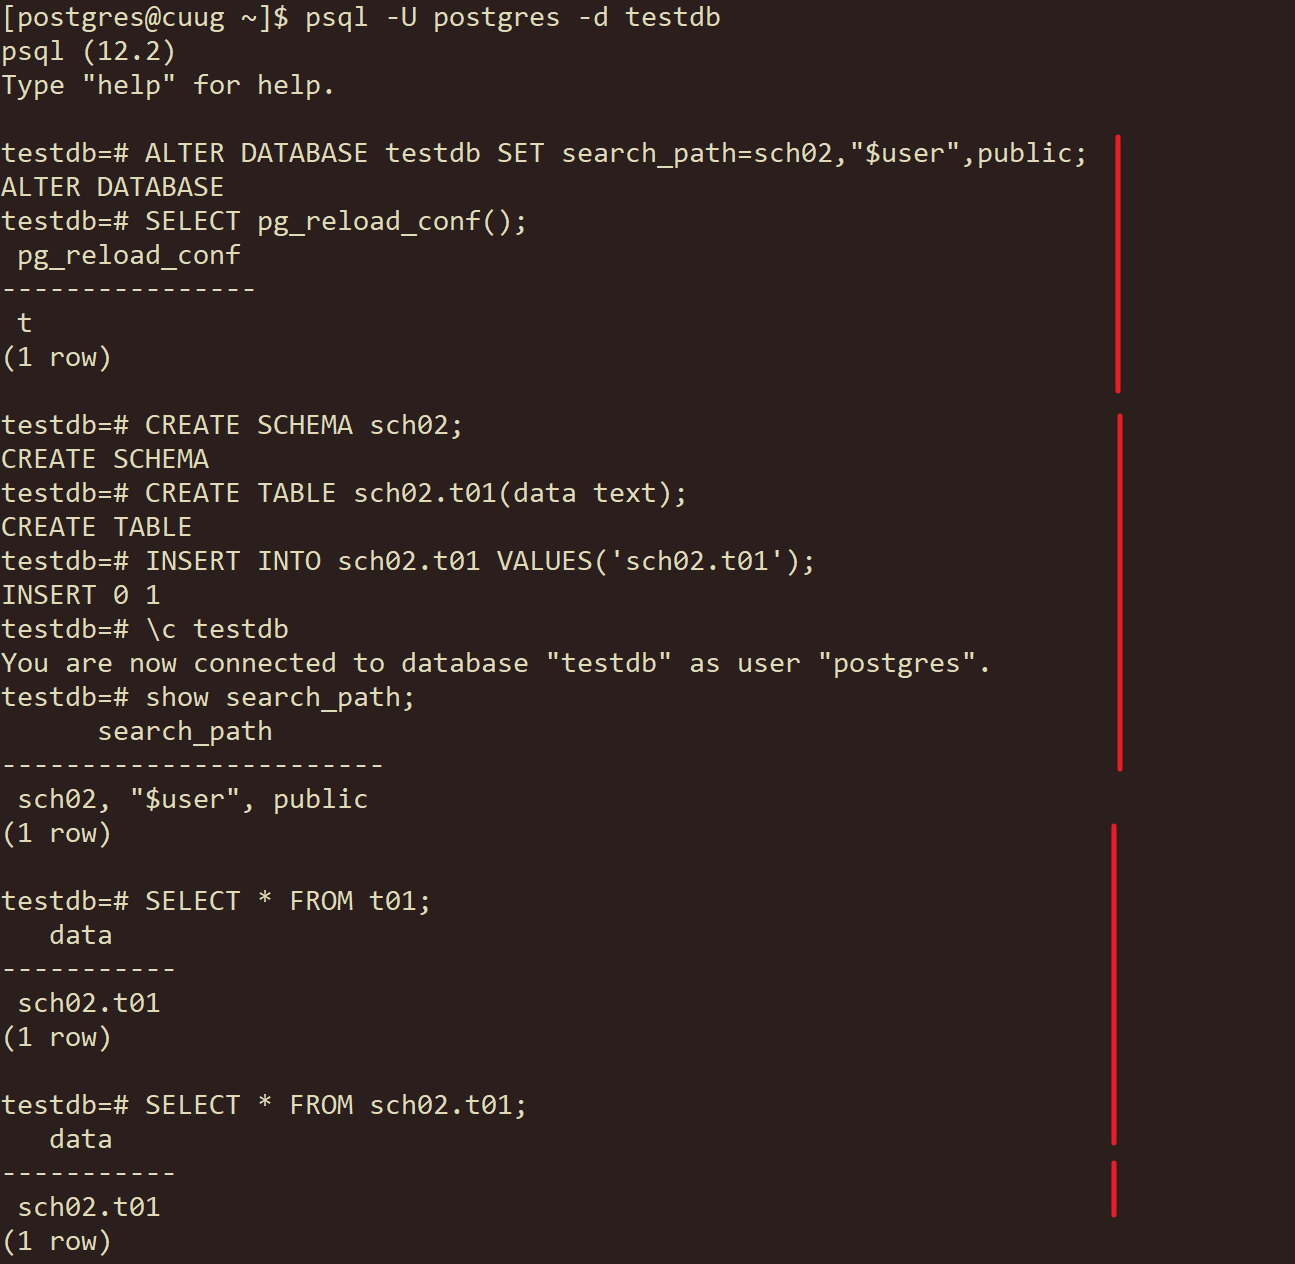
0.17. 修改search_path参数,当登录到某个数据库时自动生效。
postgresql> psql -U postgres -d testdb
ALTER DATABASE testdb SET search_path=sch02,"$user",public;
SELECT pg_reload_conf();
CREATE SCHEMA sch02;
CREATE TABLE sch02.t01(data text);
INSERT INTO sch02.t01 VALUES('sch02.t01');
\c testdb
show search_path;
SELECT * FROM t01;
SELECT * FROM sch02.t01;
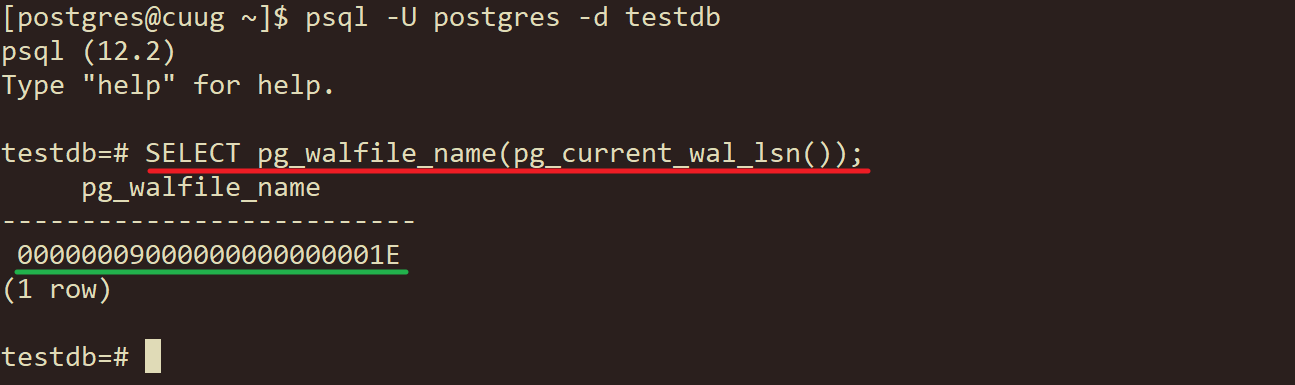
0.18. 如何查看当前用到的wal段文件
postgres>
psql -U postgres -d testdb <<EOF
SELECT pg_walfile_name(pg_current_wal_lsn());
EOF
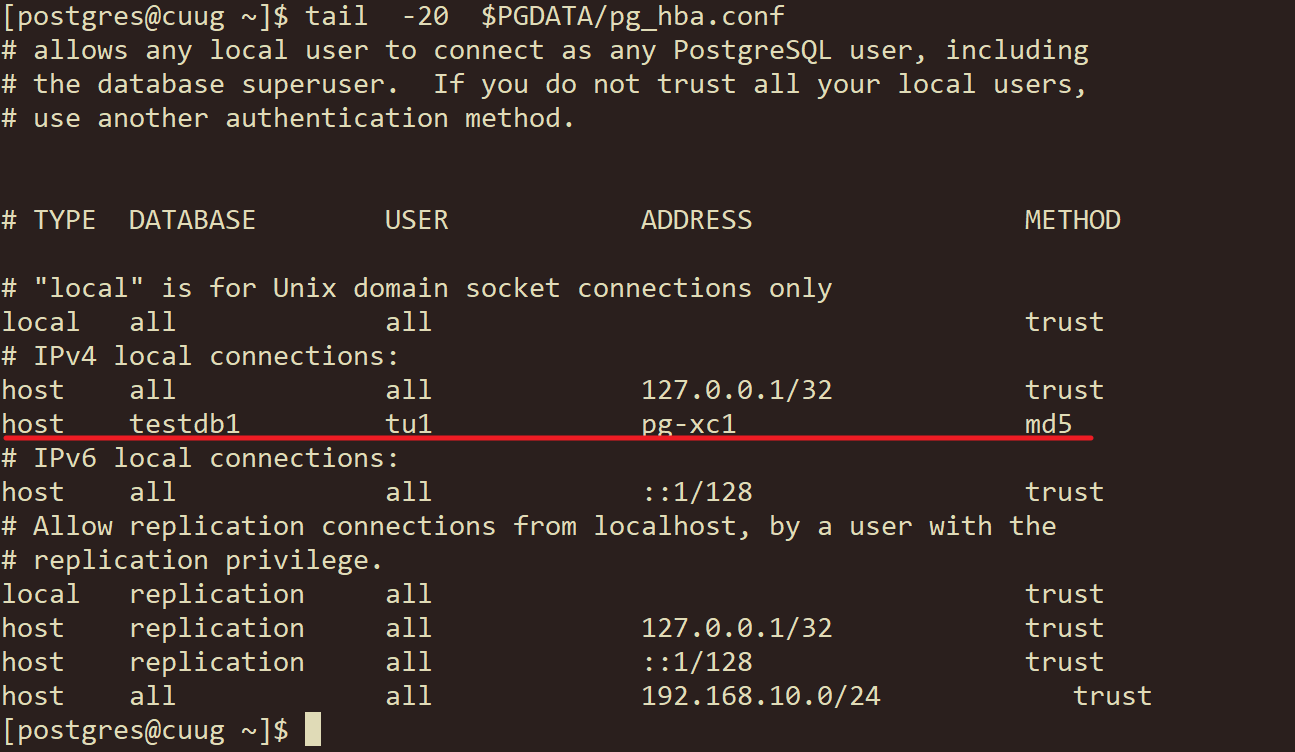
0.19. 添加白名单,允许主机名为pg-xc1的tu1用户登录testdb1数据库,使用加密密码登录。
postgres> vi $PGDATA/pg_hba.conf
postgres> cat >> $PGDATA/pg_hba.conf << EOF
host    testdb1         tu1             pg-xc1                  md5
EOF
postgres> pg_ctl reload
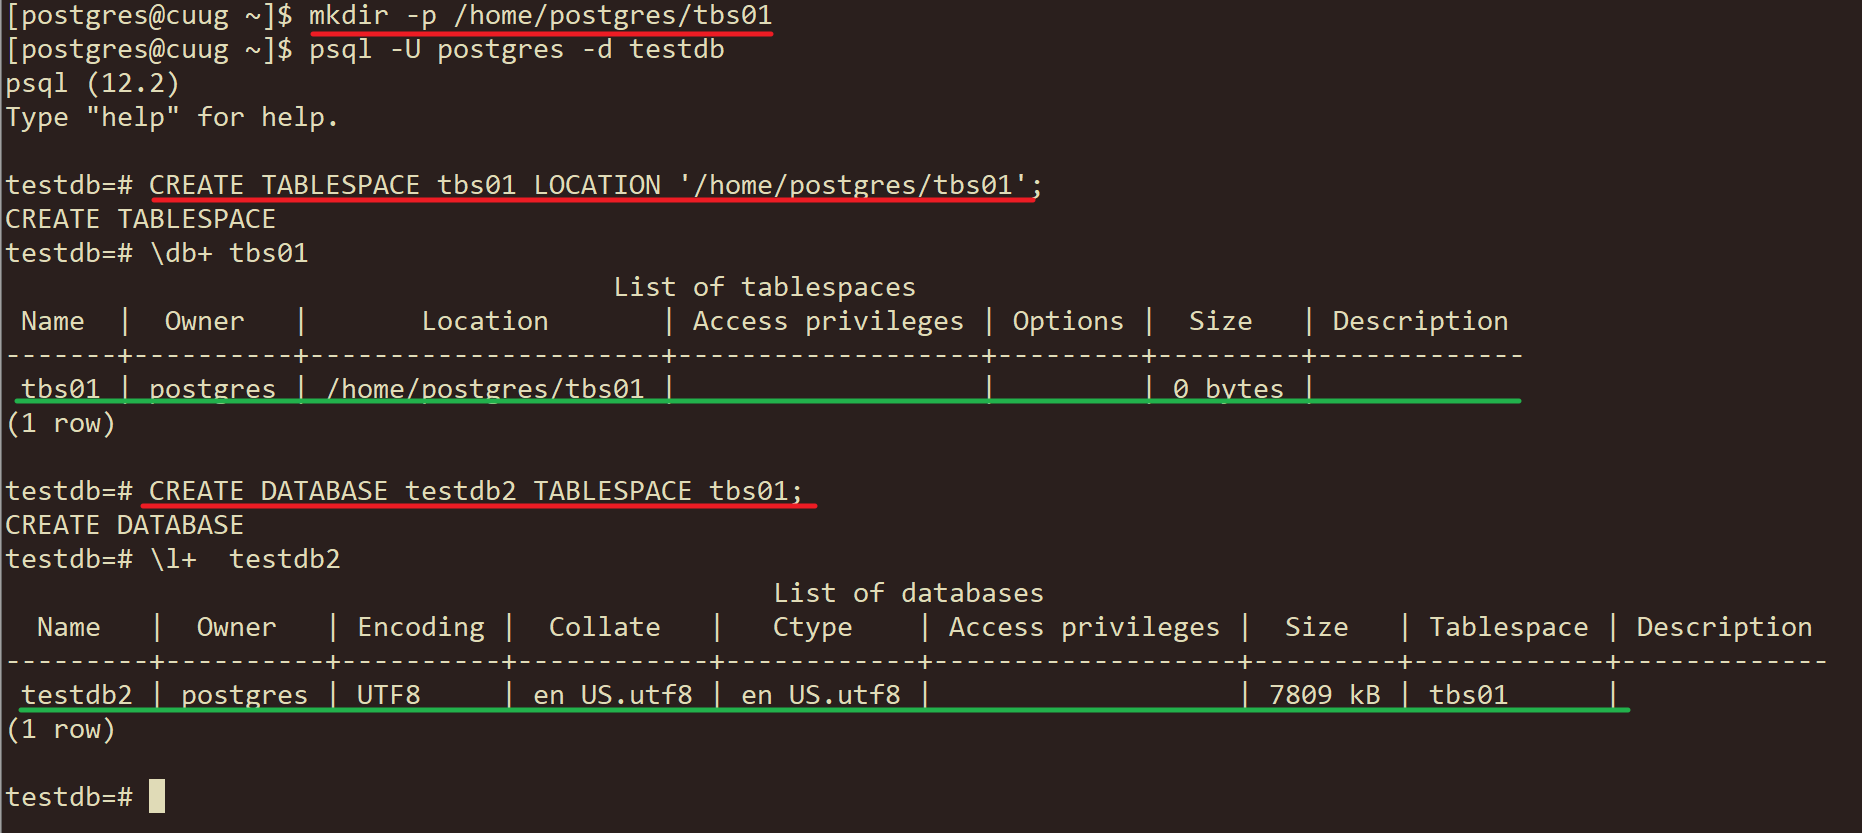
0.20. 创建一个新表空间,创建新数据库testdb2并使用新表空间。
postgres>
date
mkdir -p /home/postgres/tbs01
psql -U postgres -d testdb << EOF
CREATE TABLESPACE tbs01 LOCATION '/home/postgres/tbs01';
\db+ tbs01
CREATE DATABASE testdb2 TABLESPACE tbs01;
\l+  testdb2
EOF
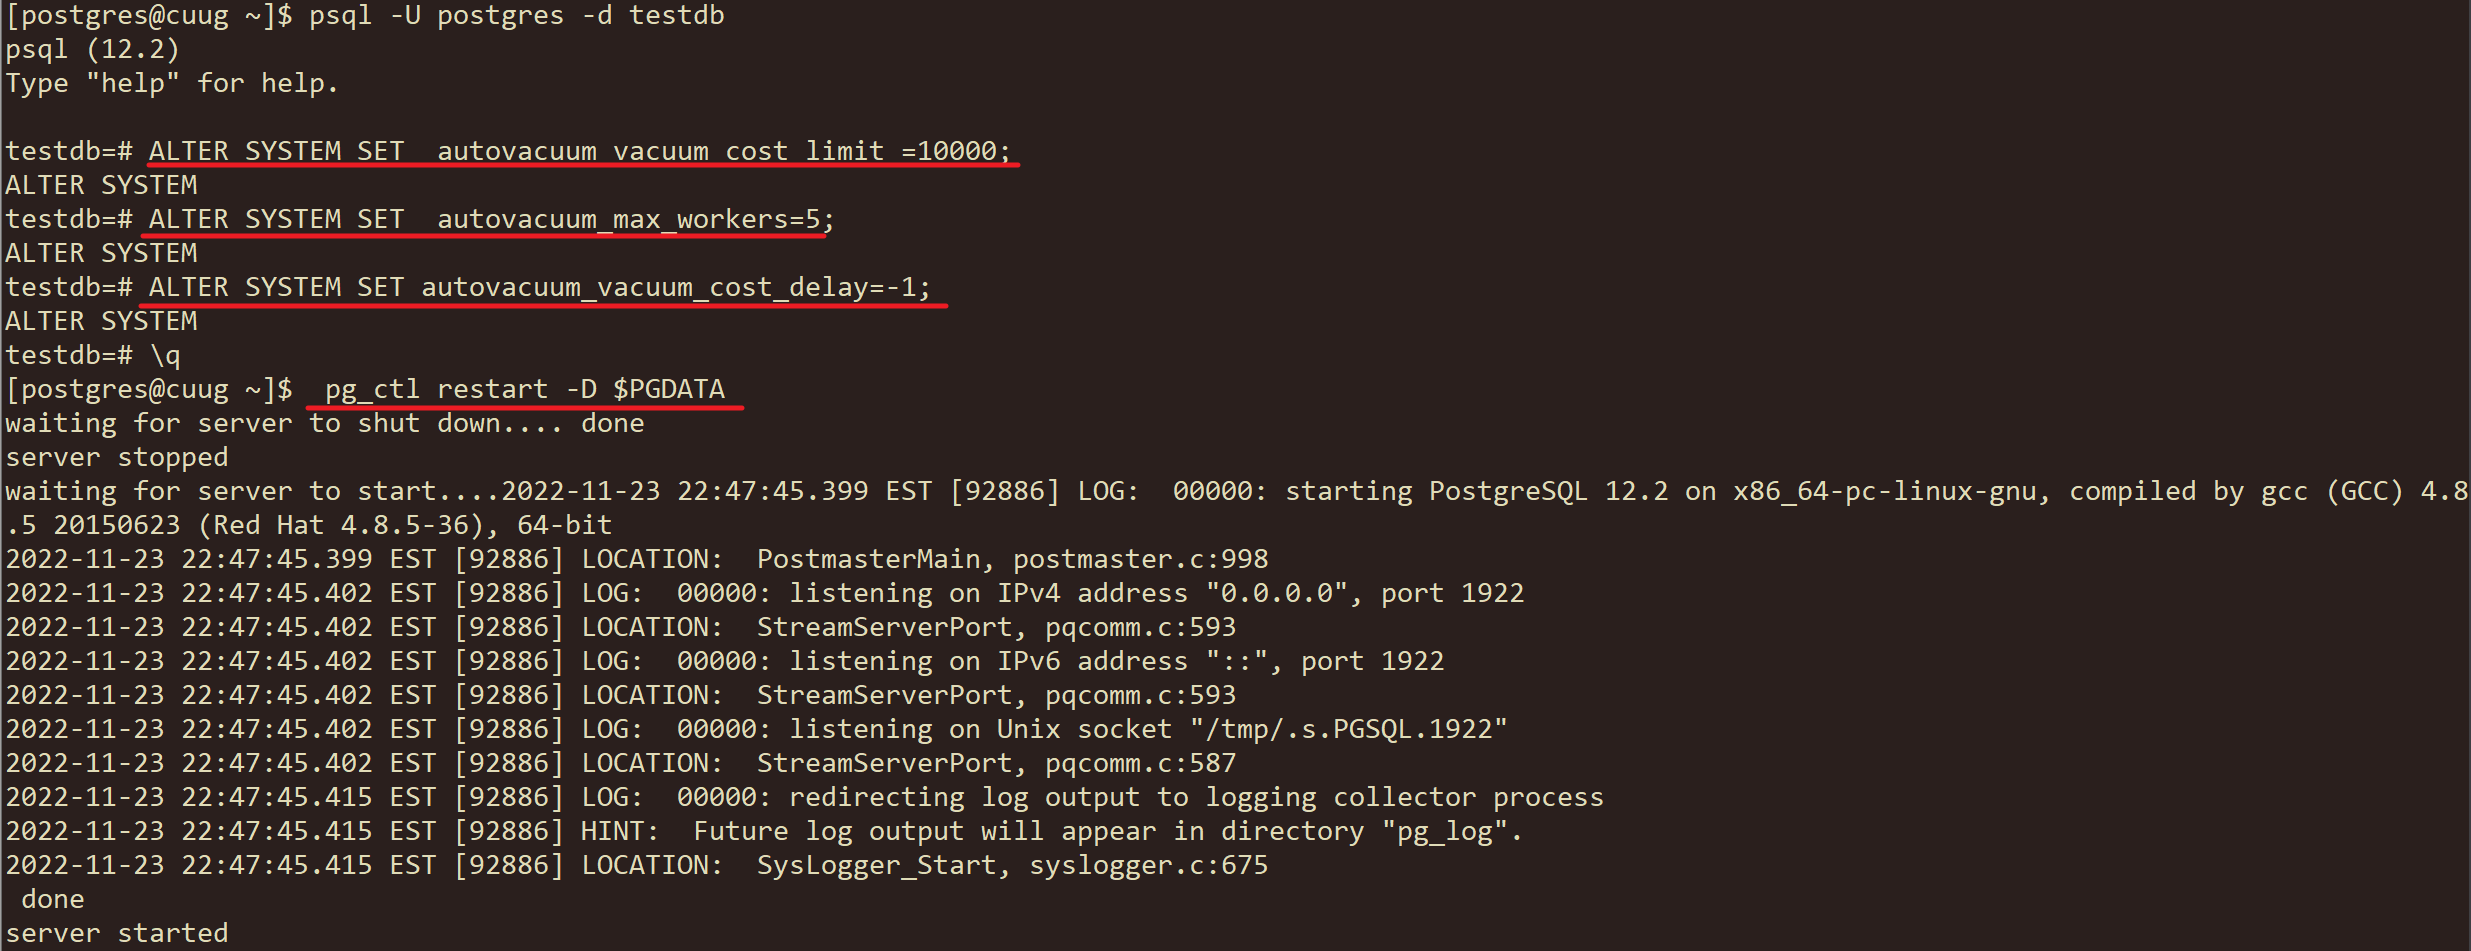
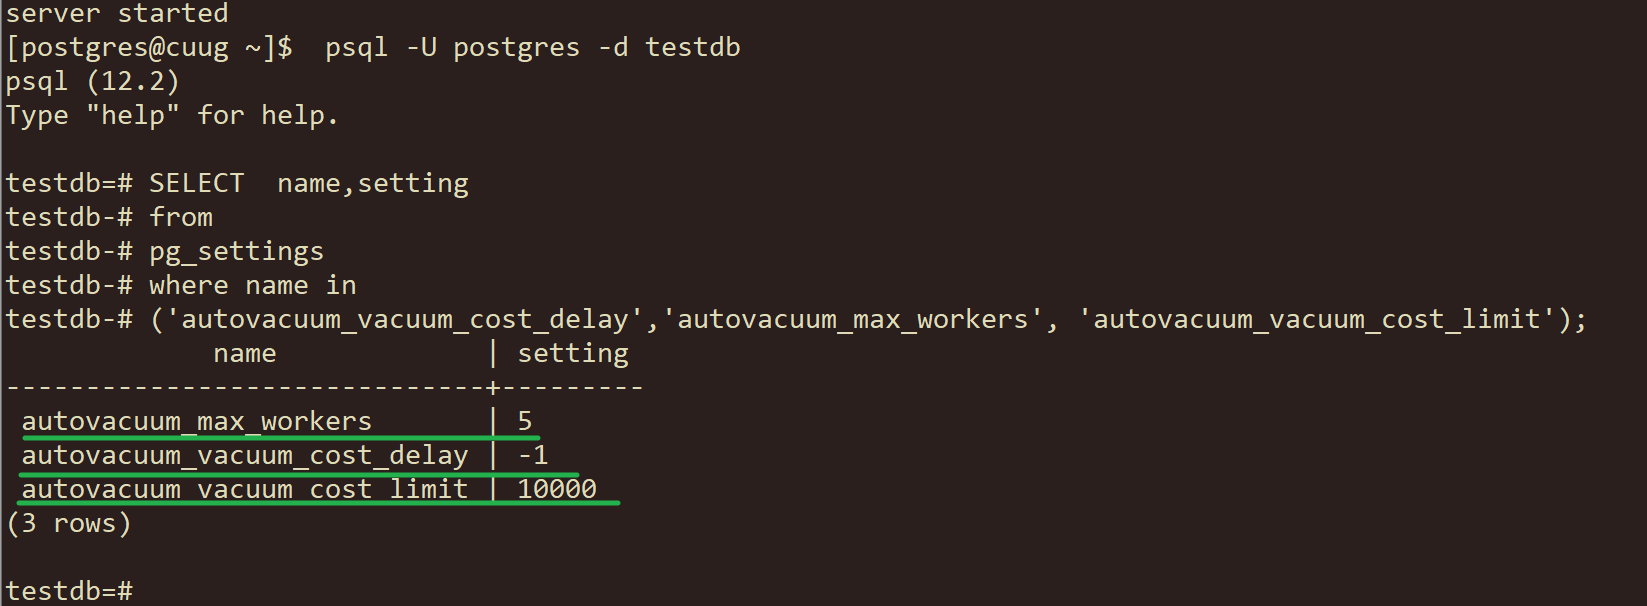
0.21. 在autovacuum时,需要同时维护5个数据库,以最快的时间处理完成,如何实现。
postgres>
date
psql -U postgres -d testdb << EOF
ALTER SYSTEM SET  autovacuum_vacuum_cost_limit =10000;
ALTER SYSTEM SET  autovacuum_max_workers=5;
ALTER SYSTEM SET autovacuum_vacuum_cost_delay=-1;
EOF

postgres> pg_ctl restart -D $PGDATA
postgres>  psql -U postgres -d testdb << EOF
SELECT  name,setting
from
pg_settings
where name in
('autovacuum_vacuum_cost_delay','autovacuum_max_workers', 'autovacuum_vacuum_cost_limit');
EOF
0.22. 考试星测试题目